how to create a powerpoint presentation from an outline

AI Presentation Generator

AI Presentation Maker

AI Image Generator

WORD to PPT

Reports to PPT

Outline to PPT

Research Papers to PPT

AI PDF Summarizer

AI WORD Summarizer

AI File Summarizer

AI Document Summarizer

Convert to PPT

AI Summarizer

Convert Outline to PPT with AI

Elaborate on an Outline into a PowerPoint Presentation for easy visualization

Select and upload an Outline that needs to be summarized for a presentation.

Step 1

Choose from a variety of presentation template styles and select the one that best represents your content.

Step 2

Relax and Watch the Magic Happen. Sit back and let AI do the heavy lifting for you! Get a customized design and stunning presentation filled with informative and professional content.

Step 3

You can then edit the presentation using your preferred application, such as MS PowerPoint or Google Slides, or with our online AI Presentation Maker.

Step 4

Superfast presentation creation

Join 1 million professionals, students, and educators

✓ Create with AI        ✓ Convert to PPT with AI        ✓ Compatible with PowerPoint        ✓ Built in templates        ✓ Auto Layout

how to create a powerpoint presentation from an outline

How to create PowerPoint slides from an Outline

However, you can also create sub-points if you want. Once the file is created, save the file in DOCX or TXT format – depending upon which app you are using to create the Outline.

Can you make a PowerPoint from an outline?

How do you create a new slide using the outline pane, sudipmajhi@twc.

Unsupported browser

This site was designed for modern browsers and tested with Internet Explorer version 10 and later.

It may not look or work correctly on your browser.

  • Communication

How to Write Powerful PowerPoint Presentations Fast With Outlines

Andrew Childress

In this tutorial, you'll learn how to write a PowerPoint outline for a presentation . You'll see a presentation outline example that shows how beneficial the process can be. It might seem like an extra step while building a presentation. But creating a presentation outline saves you time in the long run.

Blueprint for presentation

Presentation outlines are a great way to save time. So are advanced PowerPoint templates. You'll see examples of professional PowerPoint templates from Envato Elements (unlimited downloads)  in this tutorial while you learn how to write a presentation outline.

Why Should You Write a PowerPoint Presentation Outline?

You might think that learning how to write a presentation outline is an  extra  step. Writing a presentation outline takes time. But you might be surprised by how much time it ultimately saves in later steps.

It's important to see writing a presentation outline as a helpful step instead of extra work. Investing time in creating a PowerPoint outline helps you avoid rewriting and reworking your presentation.

PowerPoint presentation outline road map

When I was a rookie presenter, I made a lot of mistakes while writing a presentation. I'd open PowerPoint, spend too much time picking a theme, and then start writing my content. I jumped back and forth between slides adding points.

In short: this created an unfocused presentation. You could tell that there was a scatterbrained approach to writing content. When I started using outlines, the presentation felt more cohesive, and every point fell naturally into place.

But don't think that a PowerPoint presentation outline will be tossed in the trash when your presentation is finished. With a bit of creativity, PowerPoint presentation outlines can serve multiple purposes:

  • Use an outline as a slide of its own  to give your audience a sneak peek of the presentation's path.
  • Send your outline as a pre-read  with critical details to build anticipation for your presentation.
  • Print your outline  and keep it nearby to help you stay on topic while presenting.

Think of writing a presentation as a series of steps. Writing a presentation outline is the first step that saves time on all future steps. Learn how to do a presentation outline and more in our tutorial below:

how to create a powerpoint presentation from an outline

Now, let's dive into our tutorial on PowerPoint presentation outlines.

How to Write a PowerPoint Presentation Outline

Once you've committed to writing a PowerPoint presentation outline, you might be wondering what the process looks like. Let's learn the keys to writing a presentation outline. Then, you'll learn how to incorporate that presentation outline into your PowerPoint.

The PowerPoint screenshots that you'll see in this section use a template called Brusher from Envato Elements . 

PowerPoint Template for Outlines

Now let's look at how to create PowerPoint outlines:

1. Close PowerPoint (If It's Already Open)

If PowerPoint is open, close the application! If it's not open, don't even think about heading for the Start menu to launch it.

That's right. The most important part of writing a PowerPoint presentation outline is to leave out the app for the time being. If you don't do this, you risk spinning your wheels and redoing parts of your presentation over and over. 

PowerPoint slide sorter selection

You might be surprised at how much focus a presentation outline brings to the process of learning how to write a presentation outline.

How many tutorials tell you to close the app while learning how to make a presentation outline? Well, this one just did, and it's crucial to the process of writing a presentation outline.

2. Set a Presentation Goal

It's vital that every presentation has a single, unifying goal. A PowerPoint presentation is a series of slides with supporting points that all tie back to that goal.

This goal is the guiding principle for everything you write. Setting the presentation's goal is the  first  step for writing your PowerPoint outline. 

As you set your presentation's goal, it's also crucial to think about the  type of presentation that you're giving. I divide presentation purposes into three key types, each with their nuances when it comes to writing. Here are the three types of presentation goals:

  • To  educate  the audience on ideas and topics.
  • To  update  colleagues on the latest status of a critical project or event (think of a meeting at work where you share a project update, for example).
  • To  persuade  the audience to agree with and embrace your idea or position on an idea.

Before you start filling in the presentation outline, make sure that you've set this singular goal. Otherwise, you risk your presentation diverging into many ideas that don't support a common cause.

Singular goal for the PowerPoint presentation outline

In summary, your first outline step is to  write your presentation's goal . It's that singular measuring stick that you use as you add more content. Every time you add a new slide or supporting point, ask yourself, " does this content support my presentation's goal? "

Supporting points help reiterate the presentation's goal. But you can't support the key goal if you don't define the goal! Learning how to do a presentation outline comes back to setting a goal.

3. Add Headers for the Key Sections

Now that you've set your presentation's " north star ," you can begin to block in the critical sections that support the goal. Each section should give a new angle but play a part in reinforcing the central goal.

I tend to aim for three or four key sections per presentation. Each of those sections might include multiple PowerPoint slides.

This is commonly called the " body " of the presentation. It's the meat and bones of the presentation with the content that helps you drive your key point home. Fill in a goal as you see in the presentation outline example below:

PowerPoint Key Sections of Presentation

Let's walk through an example. Let's say that I'm attempting to inspire my audience to learn Power Query, a popular Excel data tool. The goal is to encourage them to action. I'll use three key sections that support the goal:

  • What's Power Query?  It's best not to assume that your audience already knows. 
  • Why should you use Power Query?  In a section like this, show the  benefit  of taking action. In this case, I'd show the audience how much faster data imports and transformations are when you use Power Query. This potential will inspire action.
  • How to learn Power Query.  Once I've given the audience a taste of the power of the tool at hand, it's essential to provide them with a " next step " as well. A few primary resources of tutorials can serve as a launching pad.

No two presentations are the same. The way that you support your points will vary based on the presentation's goal. Remember: Y ou're the presenter. It's your story to tell.

Now, start filling in the details for each supporting section. Just as we expanded on the goal with crucial sections, each  section  should have supporting points.

In your medium of choice, write several supporting sentences for each of your key sections. This gives you several points that support your idea. Use these support points to create individual slides.

See the screenshot below for a sample presentation outline in progress:

How to make a presentation outline example

Learn more about the writing process in this tutorial:

how to create a powerpoint presentation from an outline

4. Write the Supporting Points

"You can't boil the entire ocean... The best way to eat an elephant is one bite at a time... Divide and conquer the task at hand..." 

All these phrases mean the same thing: the best way to tackle a project is to divide it into parts. When you're creating a PowerPoint, writing a  presentation outline first is the best way to break the project into easy-to-conquer tasks.

5. Open PowerPoint and Add Your Outline

Once you've finished writing your PowerPoint presentation outline, it's time to jump back to the app finally. You've laid the groundwork for writing a presentation rapidly. Now, it's time to drop it into PowerPoint.

There are many ways to approach this task. For me, I paste the entire outline on the first slide. Then, I'll start carving that outline up, pasting the sections, and supporting points out to their slides. I use this PowerPoint outline slide to plan my presentation.

Paste outline in PowerPoint presentation

Now, start pasting those sections to their own sections. Using Outline view in PowerPoint or another tool, gradually pull your outline apart into unique sections. Instead of typing them one-by-one, just paste the sections onto new slides.

You don't have to stick with the exact text you wrote. Instead, paste the sections out and use them as the inspiration for content. By doing this, your presentation stays true to the original outline and on topic!

Brusher PowerPoint outline

PowerPoint even has a helpful feature to focus on outlines in the app. Learn more about Outline view in PowerPoint in the tutorial below:

how to create a powerpoint presentation from an outline

It might seem odd that we saved this step for last, but this approach helps you stay focused. Instead of jumping around inside PowerPoint while writing a presentation outline, consider using a separate tool.

5 More Powerful Presentation Writing Tips

Before writing your presentation outline think consider the following:

1. Have One Idea Per Slide

The minimal design in the Grey PowerPoint template make it easy to keep text minimal on your slide.

Your slides should just have your main points. If there's too much on your slide, it can be overwhelming for your audience. It can also be distracting. Instead of listening to you, your audience might be reading the text on the slide.

2. Simplify Your Sentences

Instead of having complete sentences on your slide, you can reduce text by having simple sentences.

For example, instead of saying, " When you study before a test, you will remember the material, raise your grade and be knowledgeable about the subject. " You can simplify the statement to look like this:

Benefits of Studying

  • Remember Material
  • Raise Your Grade

Simplifying your sentences, as shown above, makes it easier to follow the rules on minimizing text on your slides.

3. Have Powerful Visuals

 The Livy PowerPoint Template comes with picture placeholders on the slide, making adding images simple.

Visuals engage your audience, especially when they're eye-catching. They can also show what you’re discussing in the presentation.

If you want to add an emotional element to your presentation, a high-quality image is a great way to do that. If the image is low-quality or irrelevant, it can distract the audience. It’s best to think carefully about your visuals and what you want to add to the presentation.

4. Remember Your Audience

While writing your outline, remember who you’re writing for. One of the things you need to know about your audience is their knowledge of the subject you’re discussing. Are you speaking to a group of professionals who understand the terminology and the subject well? Or are you talking to a group of students who don’t know much about the subject?

You must also keep your audience in mind if you’re adding humor to your presentation. If you offend your audience, even accidentally, they'll stop listening to you.

5. Don’t Use Your Slides as Notes

The Compact PowerPoint Template is a multipurpose business presentation.

Don’t read off your slides. This is a common mistake that people can make. The audience can read your slides, so it can be boring to hear you repeat what’s written on the slide.

It’s more effective when you give the audience new information. If you want to have notes, you can use the speaker notes tool in PowerPoint. This tool lets you add notes that the audience won’t see.

The Best Source for PowerPoint Presentation Templates (With Unlimited Downloads)

Before we dive into how to write presentations quickly, let's take a look at another timesaver: presentation templates . PowerPoint templates already have most of the design work done for you.

On Envato Elements, you can source unlimited  PowerPoint templates  for a flat rate. The singular subscription gives you everything you need to create a presentation—fast! Many of these options include PowerPoint outline templates already built.

Explore PowerPoint Templates

Envato Elements PowerPoint template library

Not only will you unlock unlimited PowerPoint templates, but you'll also gain access to many other creative assets. That includes stock photos, graphics, illustrations, and more!

Top Envato Elements Presentation Templates

As you finish up your PowerPoint outline, why not pair it with a presentation outline template to rapidly craft your presentation? Here are three of our favorites in the Envato Elements library, all included as a part of the subscription!

1.  Outline - PowerPoint Template

PowerPoint presentation outline

The name might be a coincidence, but this PowerPoint presentation titled Outline is a perfect choice for many purposes. You've got 30 slides across five color schemes that are ready for practically any topic.

Flexible PowerPoint templates like this make it easy to adapt your presentation outline easily thanks to their well-designed structure.

2.  Business Strategy Two PowerPoint Template

Business Strategy PowerPoint Presentation outline

The strategy is the unifying direction for a business or project plan. They work well with PowerPoint outlines thanks to the focused approach. This template captures many of the most popular strategy deliverables like:

  • triple bottom line analyses
  • and so much more

3.  Creativeplus - Agency PowerPoint Template

Creativeplus PowerPoint outline presentation

Are you running a creative agency? This PowerPoint template is sure to be a hit. It's useful for pitching projects or showing off your design chops. It's easy to update and has a fresh design that's certainly on-trend.

If you're still looking for presentation outline templates that save you time, Envato Elements might be right for you. Grab a template and design it rapidly!

More PowerPoint Presentation Templates

We've just scratched the surface of what's possible with templates for PowerPoint. Templates are the best way to save many hours of design work. Here are several articles with the best selection of PowerPoint templates:

how to create a powerpoint presentation from an outline

More Powerful PowerPoint Resources

Learning how to write a presentation outline is just one of the many skills you need to become a confident presenter. Think of your learning journey in PowerPoint as a series of building blocks. Each skill gives you a steadier foundation.

Also, check our top-rated learning resource, How to Use PowerPoint (Ultimate Tutorial Guide.) It's a comprehensive source of the best learning materials to master PowerPoint.

You've already learned how to write an outline for a presentation. Keep learning with these three excellent tutorials:

how to create a powerpoint presentation from an outline

Start Writing Your PowerPoint Presentation Outline Today

You learned how to make a PowerPoint outline for a presentation. Writing a PowerPoint outline is a surefire way to save time and improve your presentation. It brings a focus and consistency to the content.

Every presentation is different. That means that every PowerPoint outline will differ. This guide offers general guidelines to help you. But remember to be confident in your subject knowledge.

Before you start writing a presentation, remember that writing an outline first is the best way to do it. Set a goal, write a few key sections, and fill in your supporting details. Then, rapidly build the slides with your content.

Don't forget! PowerPoint presentation templates from Envato Elements are major time-savers too! Use them alongside your outline to write presentations quickly. 

Editorial Note : This post was originally published in February of 2020. It's been updated for accuracy with help from Sarah Joy .

Andrew Childress

Art of Presentations

Outline View in PowerPoint – Everything You Need to Know!

By: Author Shrot Katewa

Outline View in PowerPoint – Everything You Need to Know!

Not a lot of people are aware that you can actually make a presentation by outlining your key points in a simple bulleted list format! This is where the Outline View in PowerPoint comes in handy!

In today’s article, we will take a look at the “Outline View” in PowerPoint, how to access it, and how to work with your presentation in the outline view!

So, let’s get started!

1. What is Outline View and Why is it Used?

The “Outline View” in Microsoft PowerPoint is a way of accessing the slides in a more simplistic manner. It removes the clutter of images and other infographics from your slides and helps you focus specifically on the text present on the slides.

In the outline view, you can see a list of the titles, subtitles as well as text on each slide. Using the outline view you can easily organize key information on your slides. You can also export or import the outline to and from other documents.

Furthermore, the outline view is also editable, which makes it easier to add or remove any text from the PowerPoint presentation.

2. How to Access the Outline View in PowerPoint?

how to create a powerpoint presentation from an outline

In Microsoft PowerPoint, you can very easily access the outline view and navigate it.

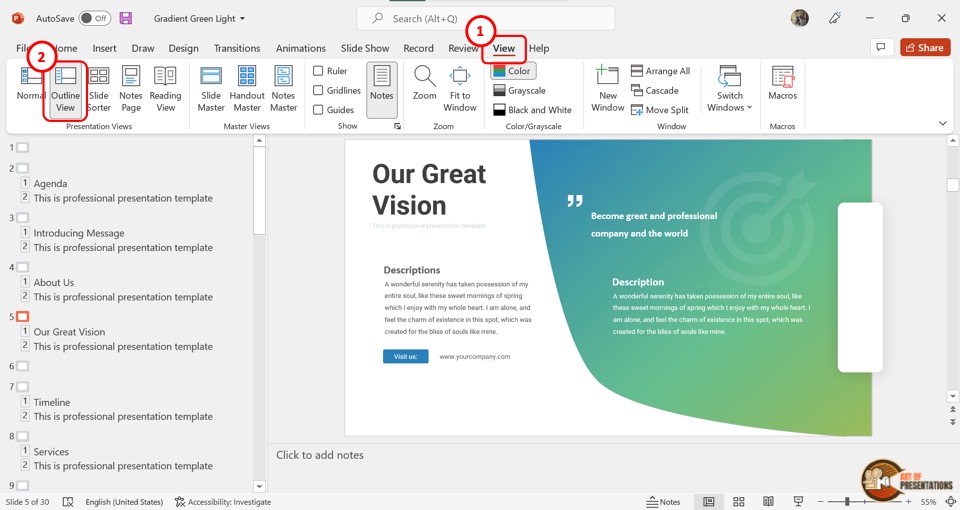
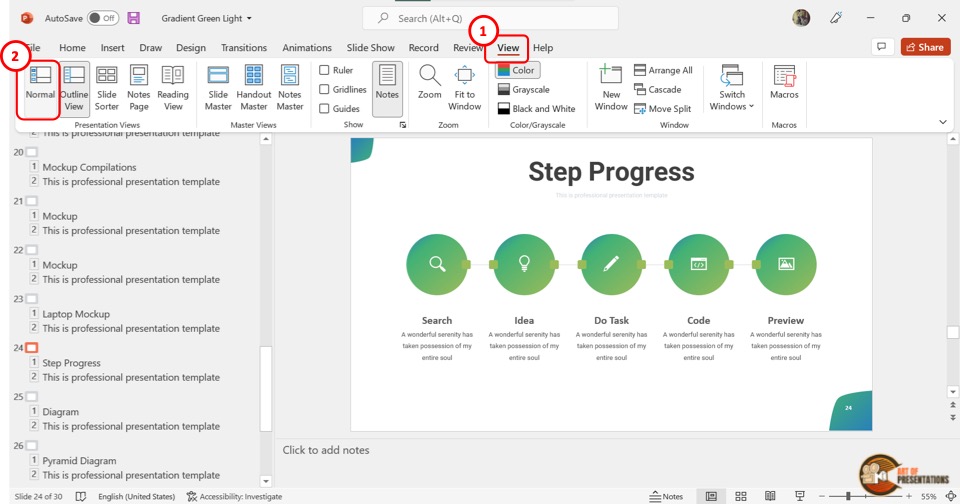
To access the outline view in PowerPoint, first, click on the “View” tab in the menu bar located at the top of the screen. In the “View” menu, click on “Outline View” which is the second option in the “Presentation Views” section.

This will show the presentation outline in a sidebar on the left side of the screen.

3. How to Expand Slides in Outline View?

In the “Outline View” , you can expand any or all slides to view all the content within the slide. There are 3 different methods you can use to expand the slides in the outline view.

3a. Method 1 – Using Right-Click

how to create a powerpoint presentation from an outline

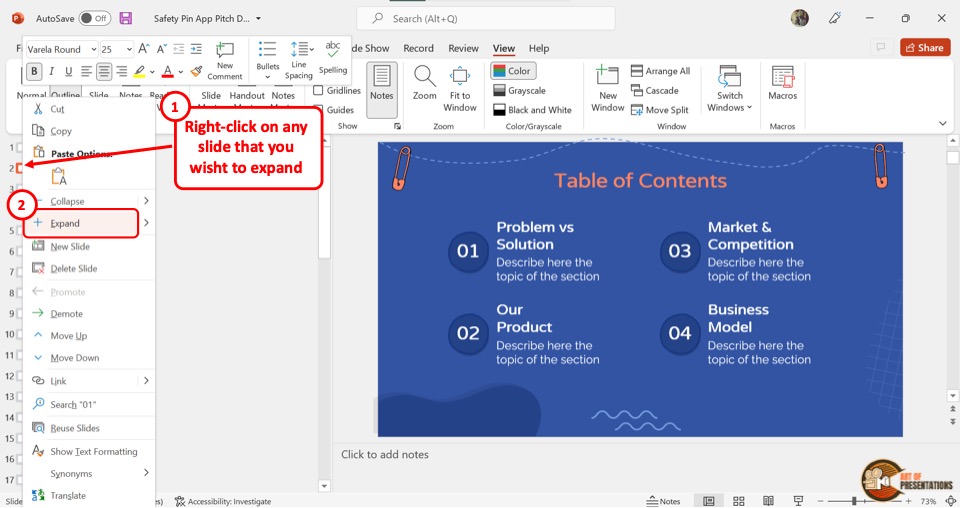
You have to first open the “Outline View” from the “View” menu. In the outline sidebar located at the left side of the screen, “Right Click” on the box beside the slide number which you want to expand.

Then click on the “Expand” option from the right-click menu.

3b. Method 2 – Using Double-Click

how to create a powerpoint presentation from an outline

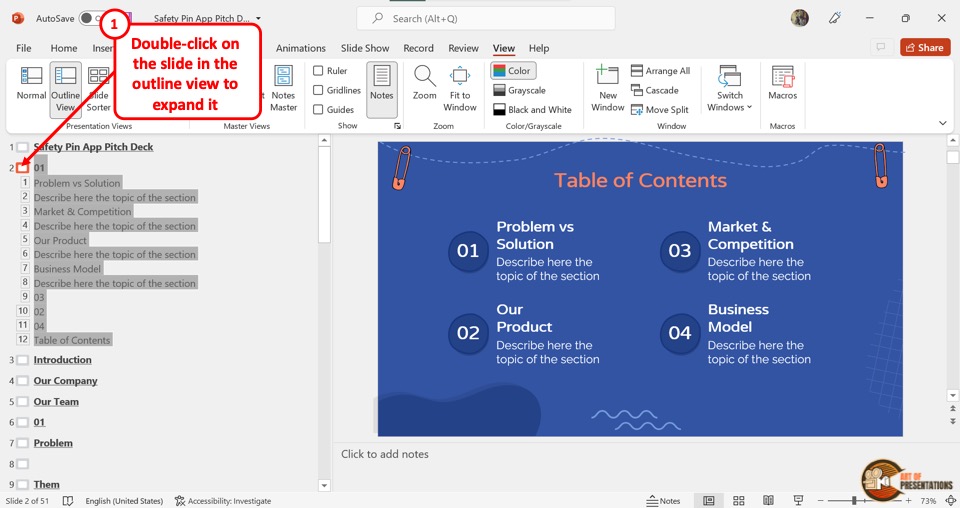
You can use the double-click method to quickly expand the slide outline. All you have to do is “Double Click” on the box located between the slide number and the slide title.

3c. Expand All Slides Using Expand All Feature

how to create a powerpoint presentation from an outline

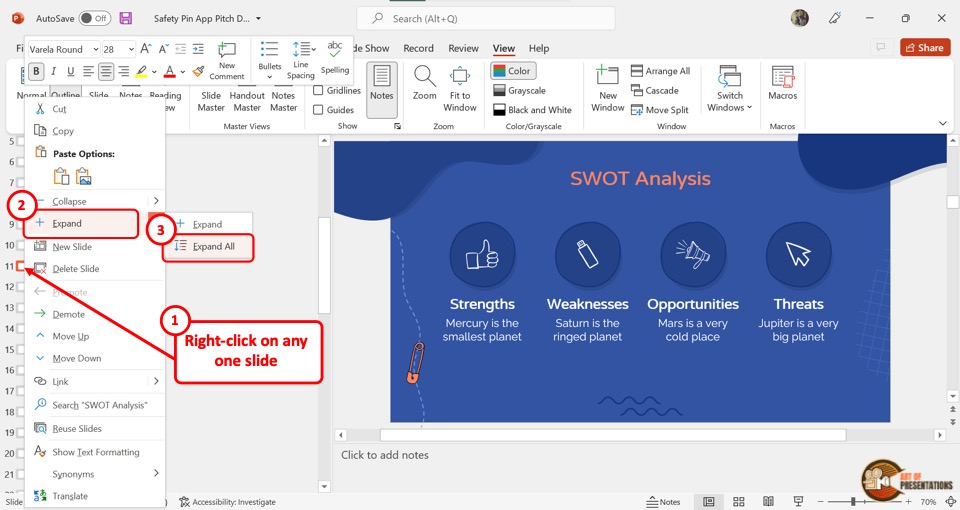
In the “Outline View” , you can also expand all the slides at once. To do so, “Right Click” on the box next to any slide. In the right-click menu, click on the arrow beside the “Expand” option to open another dropdown menu.

Then click on the “Expand All” option to expand all the slides.

4. How to Collapse Slides in Outline View?

Microsoft PowerPoint offers various methods to collapse slides in the “Outline View” . Collapsing the slides can help you see the list of the slides in a presentation easily.

4a. Using Right-Click

how to create a powerpoint presentation from an outline

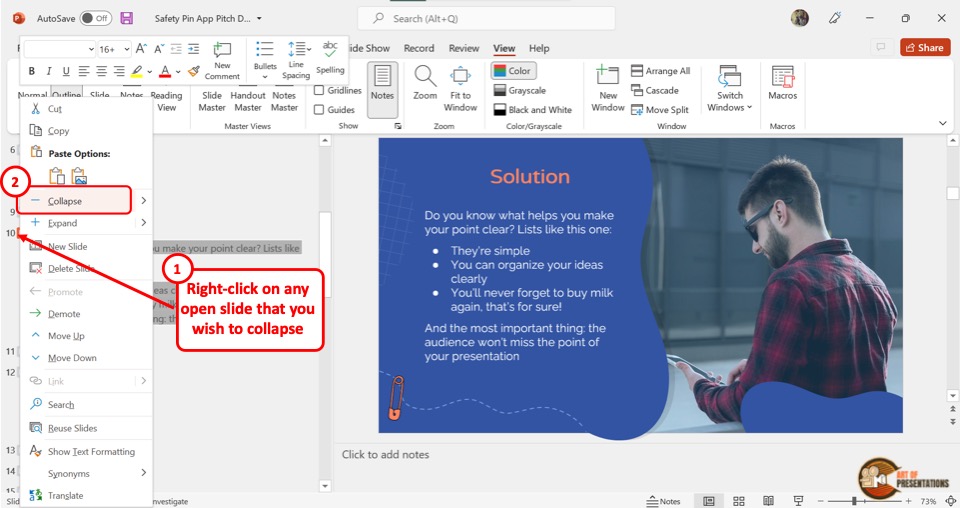
In the “Outline View” , locate the expanded slide from the sidebar on the left side of the screen. Then “Right Click” on the box next to the slide number and click on the “Collapse” option from the pop-up menu.

4b. Using Double-Click

how to create a powerpoint presentation from an outline

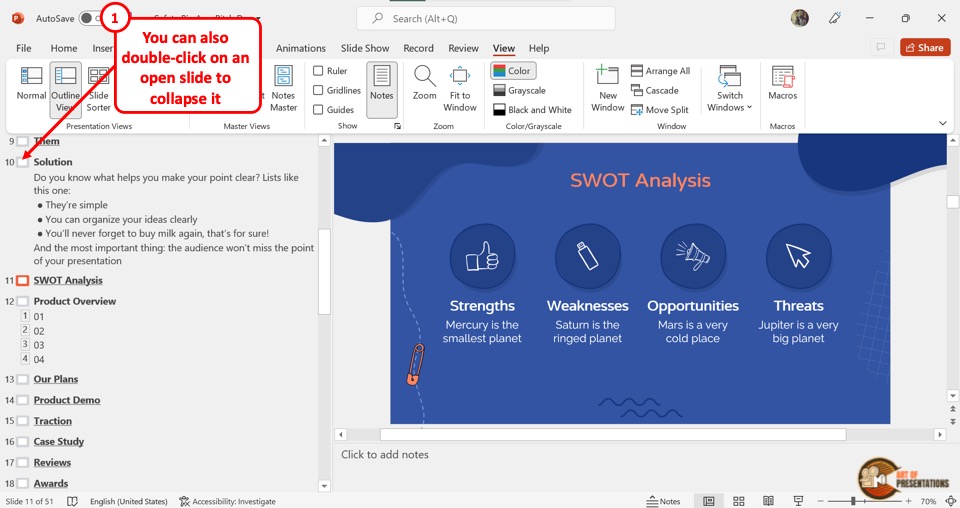
To collapse a slide using the double-click method, all you have to do is “Double Click” on the box at the left side of the expanded slide. The slide will immediately collapse hiding all the text except the heading.

4c. Collapse All Feature

how to create a powerpoint presentation from an outline

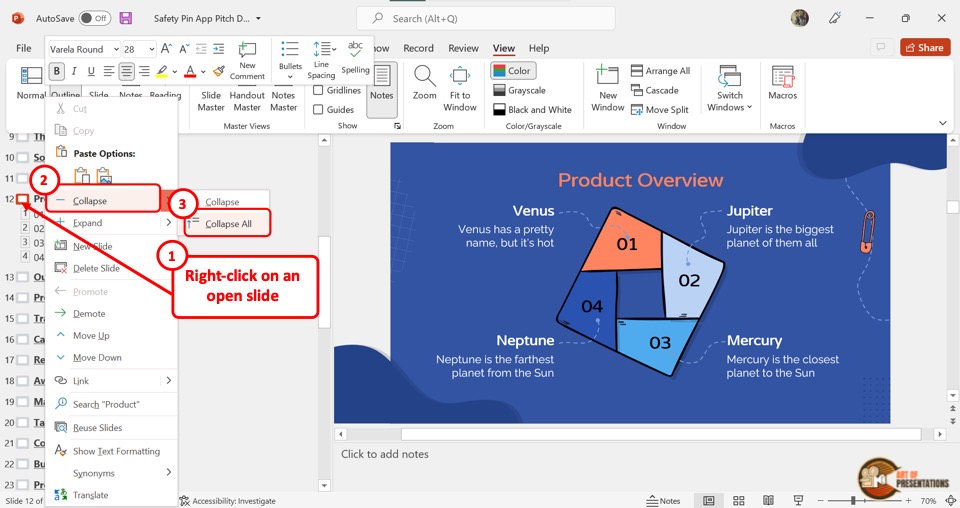
You can also collapse all the slides at once. To do so, “Right Click” on any slide in the outline. Then click on the arrow beside the “Collapse” option.

Finally, you have to click on the “Collapse All” option from the secondary pop-up menu.

5. How to Rearrange Slides in Outline View?

When reviewing the outline of a PowerPoint presentation, you may need to rearrange some slides based on their contents.

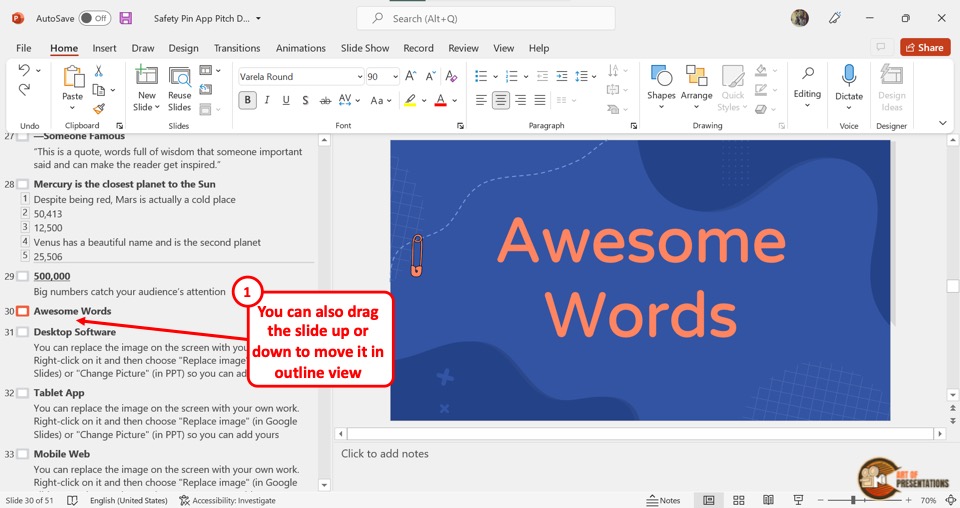
In the “Outline View” , you can move a slide in between the contents of another slide. You can also simply move a slide up or down.

5a. How to Move Up Slides in Outline View?

In the “Outline View” , you can move a slide up by one or even more slides. There are different methods to move up slides in PowerPoint. The first step is to click on the “Outline View” option from the “View” menu.

Method 1 – Using Right-Click

how to create a powerpoint presentation from an outline

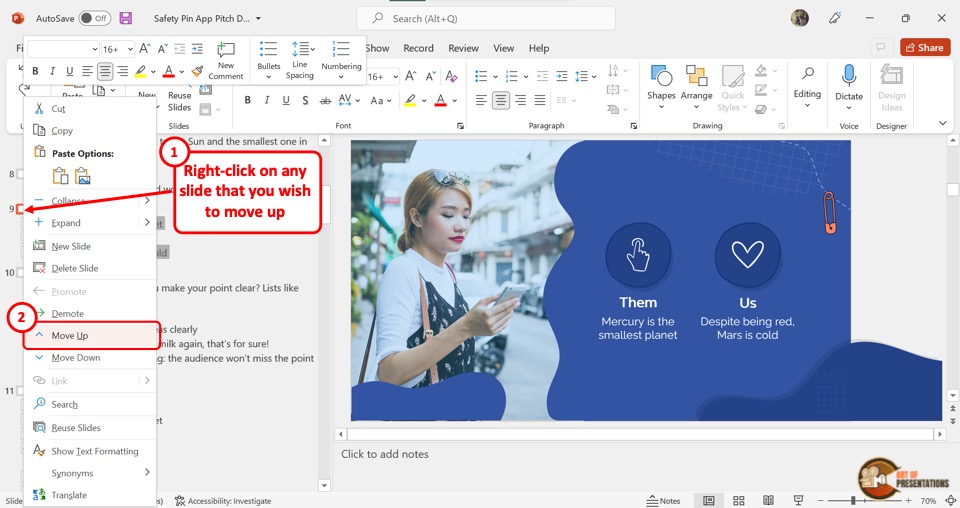
In the “Outline View” sidebar at the left side of the screen, “Right Click” on the slide you want to move up. Then click on the “Move Up” option from the right-click menu.

To move up the slide further, repeat the process until the slide reaches the preferred position in the outline.

Method 2 – Using Drag & Drop

how to create a powerpoint presentation from an outline

You can also move up a slide quickly by using the drag and drop method. All you have to do is click and hold on to the box next to the slide number and then drag the slide up as much as you need.

5b. How to Move Down Slides in Outline View in PowerPoint?

how to create a powerpoint presentation from an outline

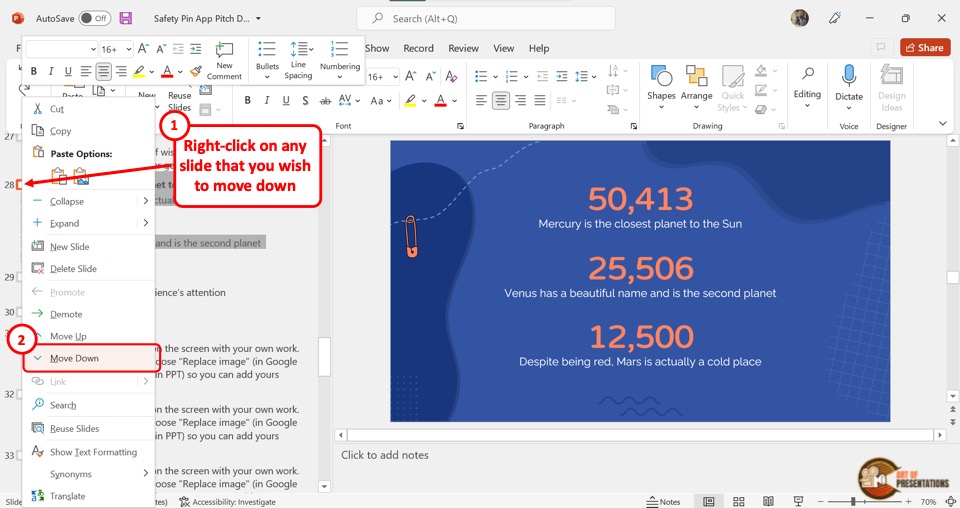
Similar to the process of moving up a slide, you can easily move down a slide. All you have to do is “Right Click” on the slide from the outlines on the left side of the screen.

Then click on the “Move Down” option from the pop-up menu. Alternatively, you can drag and drop the slide to the preferred position.

6. How to Add Content on Slides Using Outline View?

The presentation outline in the “Outline View” is editable. Thus, you can edit the content of a slide by editing the outline. To add content on slides using the “Outline View” , follow the 2 simple steps.

Step-1: Open the Outline View

how to create a powerpoint presentation from an outline

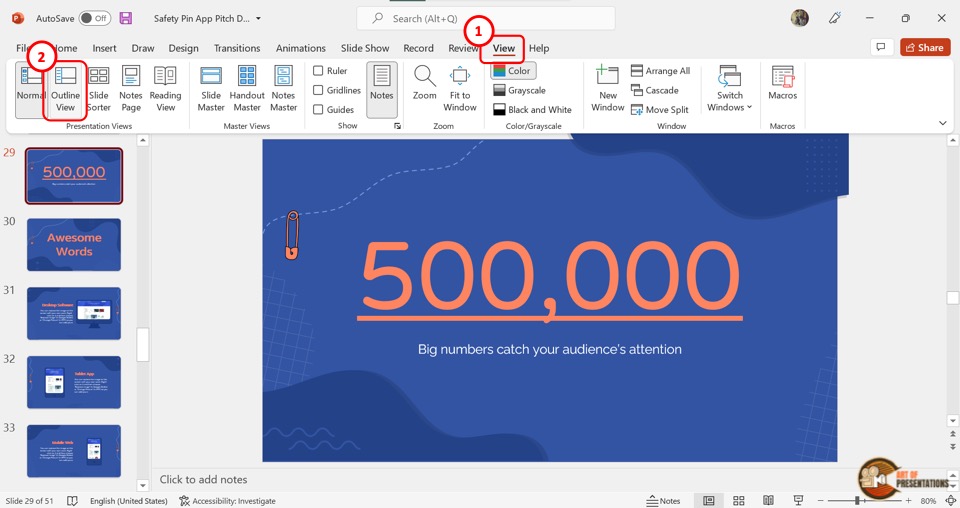
In the menu ribbon located at the top of the screen, click on the “View” tab. You have to then click on the “Outline View” option which is the second option in the “Presentation Views” section of the “View” menu.

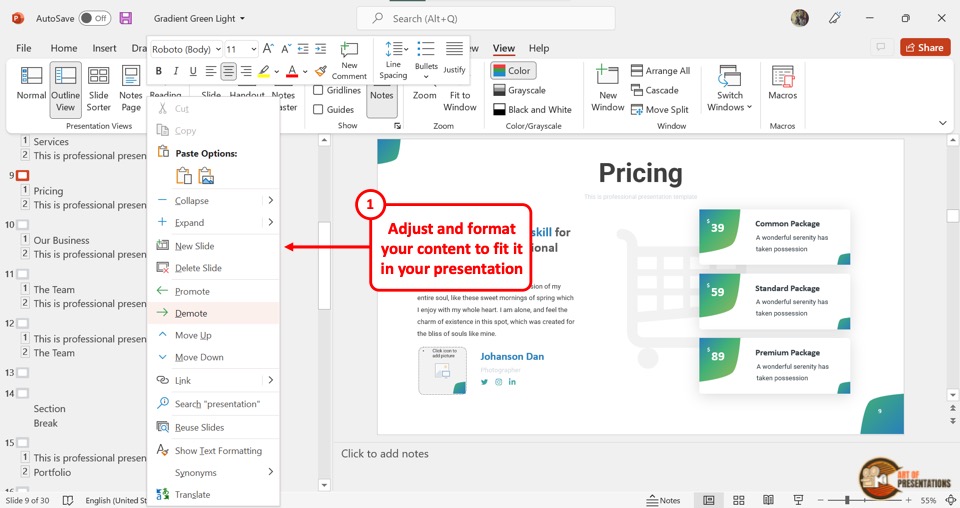
Step-2: Click on the slide and add content to the outline

how to create a powerpoint presentation from an outline

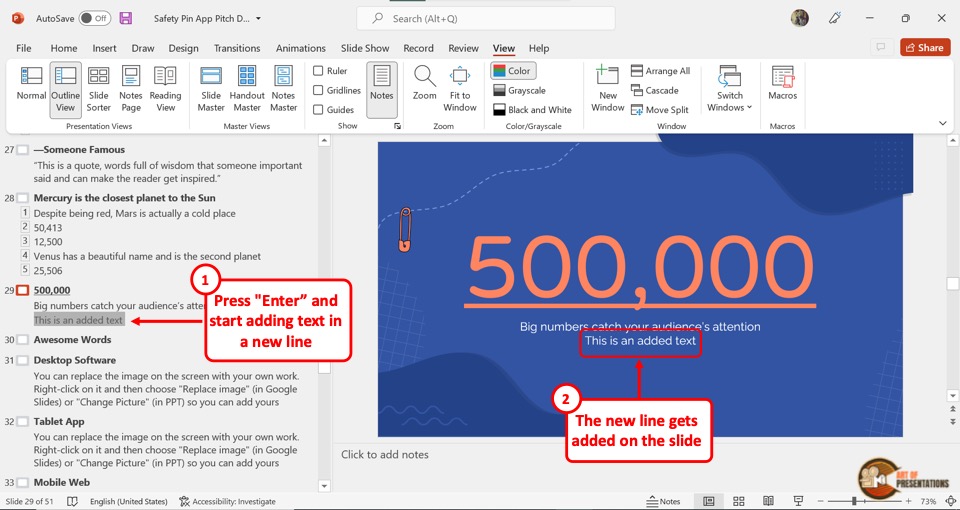
In the outline sidebar at the left side of the screen, click on the slide and heading level where you want to add content. Then type in the content. You will see the text being added to the presentation slide.

If you want to add text in a new line, simply press “Enter” and start adding the content. It will be visible separately on the slide.

6a. How to Increase or Decrease Indent of Content in Outline View?

To increase or decrease the indent of content in the “Outline View” , click on the “Home” tab in PowerPoint . Next, you have to click on the content in the outline sidebar for which you want to change the indentation.

Increase Indentation

how to create a powerpoint presentation from an outline

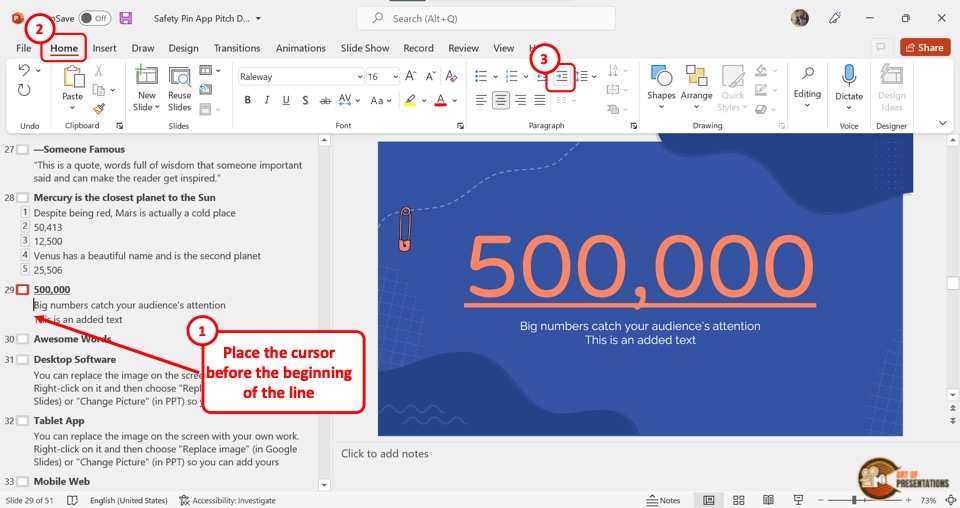
By increasing the indent level, you push the content to the right. The content is thus moved to a higher list level. To increase the indentation, click on the “Increase List Level” option in the “Paragraph” section of the “Home” tab in PowerPoint.

Decrease Indentation

how to create a powerpoint presentation from an outline

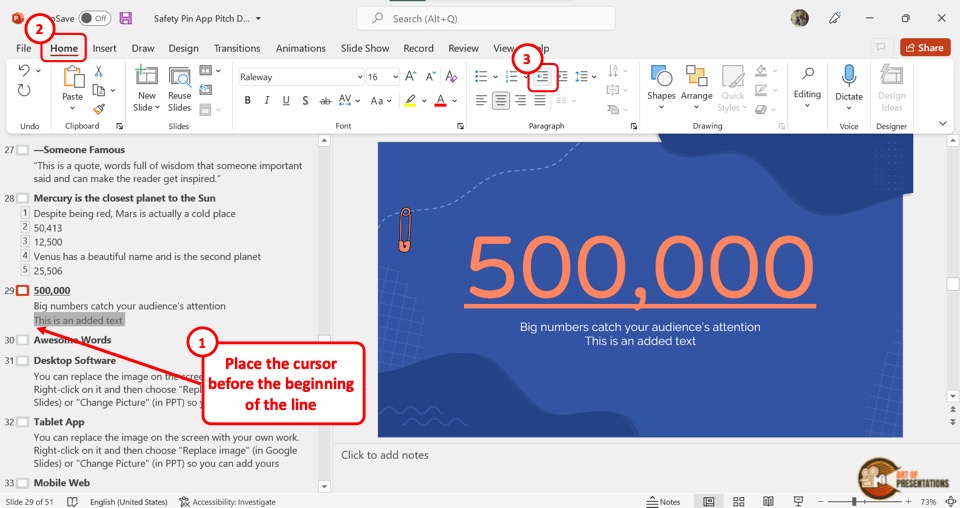
By decreasing the indent level, you can push the content to the left, and decrease the list level. To do so, click on the “Decrease List Level” option in the “Paragraph” section of the “Home” menu.

7. How to Change Content Hierarchy Using Outline View in PowerPoint?

In the “Outline View” , you can change the content hierarchy of the contents within a slide.

Content hierarchy is the order of the content in a slide. The top of the hierarchy is the heading and then the “List level 1” , “List level 2” and so on.

7a. Promote Content in Outline View in PowerPoint

how to create a powerpoint presentation from an outline

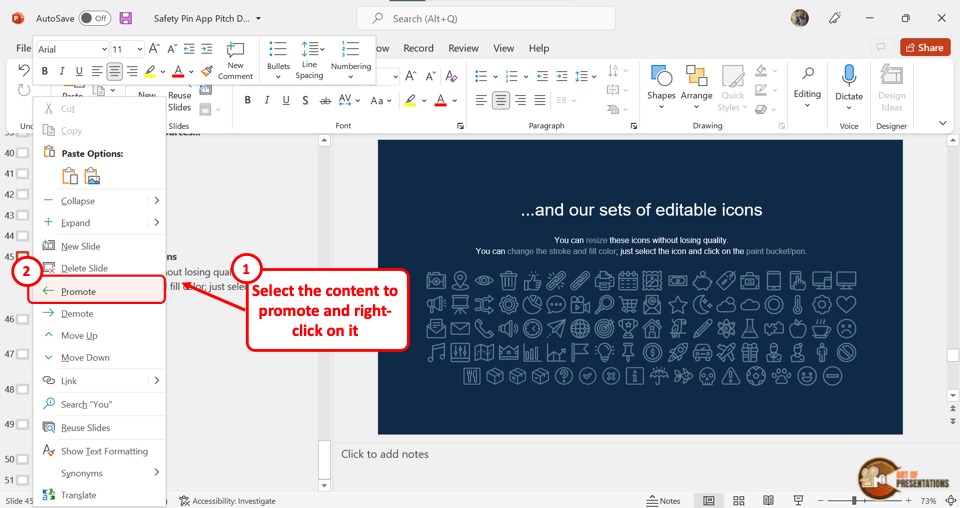
Promoting content pushes the content up the hierarchy.

To promote content in outline view in PowerPoint, you have to first “Right Click” on the content in the outline sidebar. Then click on the “Promote” option from the right-click menu.

You can repeat this process to promote the content up to a few hierarchy levels. However, you cannot promote a “Heading” since it is the highest level in the hierarchy.

7b. Demote Content in Outline View in PowerPoint

how to create a powerpoint presentation from an outline

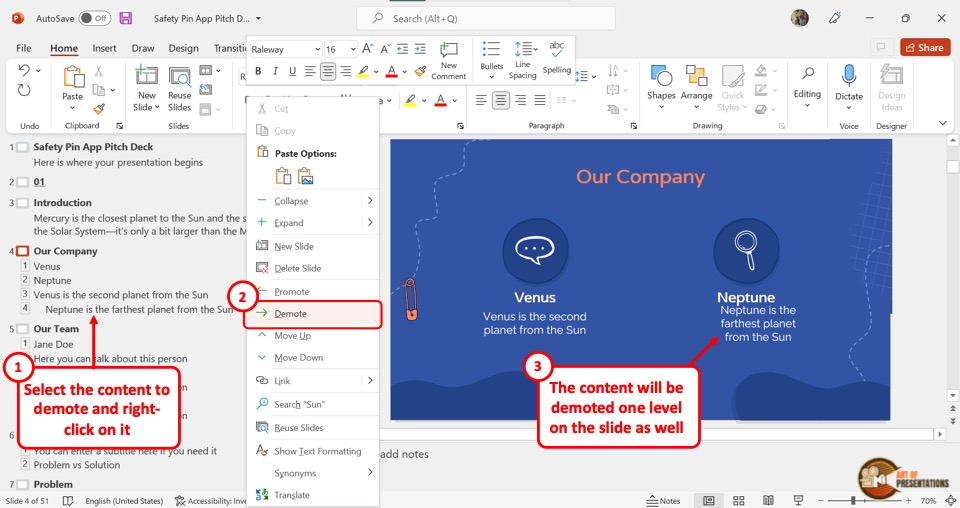
When you demote content, it is pushed down the hierarchy.

To demote content in outline view in PowerPoint, “Right Click” on the content in the outline that you want to demote. Then click on the “Demote” option.

You can repeat the process to move the content further down the hierarchy. For headings, you can only demote the heading of a text-only slide.

8. How to Go Back to Normal View from Outline View in PowerPoint?

how to create a powerpoint presentation from an outline

If you want to exit the “Outline View” , you can easily return to the “Normal View” in PowerPoint.

To go back to “Normal View” from “Outline View” , all you have to do is click on the “View” tab in the menu ribbon. Then click on the “Normal” option which is the first option in the “View” menu.

9. How to Save Your PowerPoint Presentation as an Outline?

Besides viewing the presentation outline, you can also save your PowerPoint Presentation as an outline. All you have to do is follow the 4 easy steps.

Step-1: Click on the “Save As” option

how to create a powerpoint presentation from an outline

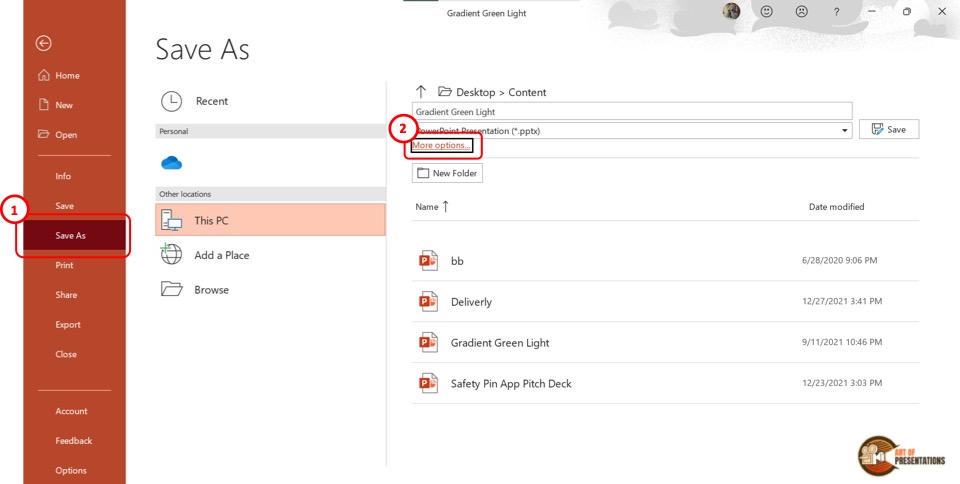
In the menu ribbon at the top of the screen, click on the “File” tab to open the “File” menu. Then click on the “Save As” option in the “File” menu.

Step-2: Click on “More options”

In the “Save As” screen, click on the “More options” option which is above the “New Folder” button (as shown in the image in step 1). This will open a dialog box.

Step-3: Click on “Outline/RTF”

how to create a powerpoint presentation from an outline

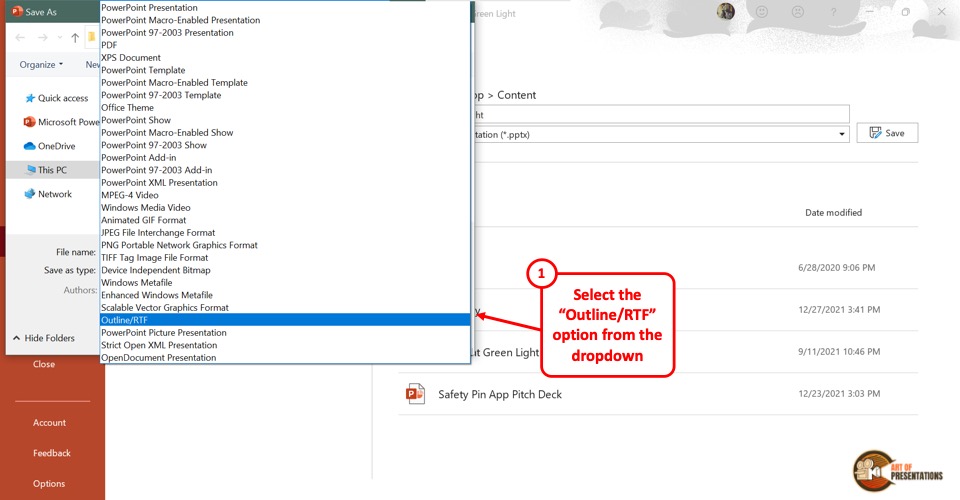
In the “Save As” dialog box, click on the “Save as type” box at the bottom. Then click on the “Outline/RTF” option from the pop-up menu.

Step-4: Click on the “Save” option

how to create a powerpoint presentation from an outline

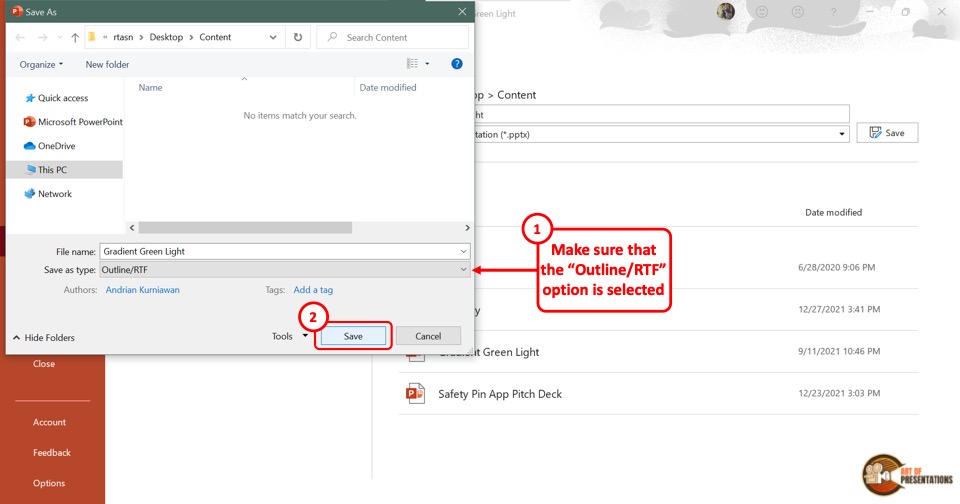
Now all you have to do is click on the “Save” button at the bottom of the “Save As” dialog box. This will save the PowerPoint presentation as an outline.

10. How to Print Outline View in PowerPoint?

Microsoft PowerPoint allows you to print the outline of the presentation only. All you have to do is follow the 3 simple steps.

Step-1: Click on the “File” tab

how to create a powerpoint presentation from an outline

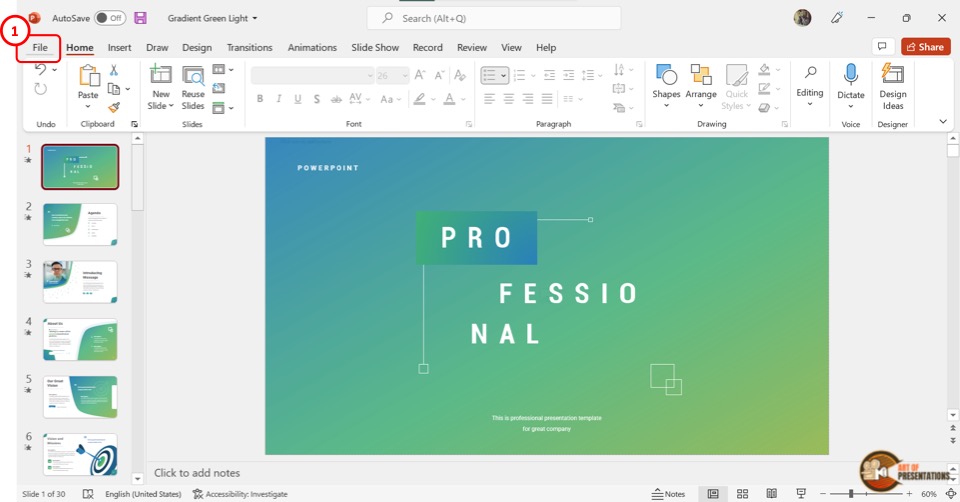
In the open PowerPoint presentation, click on the “File” tab from the menu ribbon located at the top of the screen. In the sidebar of the “File” menu, click on the “Print” option.

Step-2: Click on the “Print Layout” option

how to create a powerpoint presentation from an outline

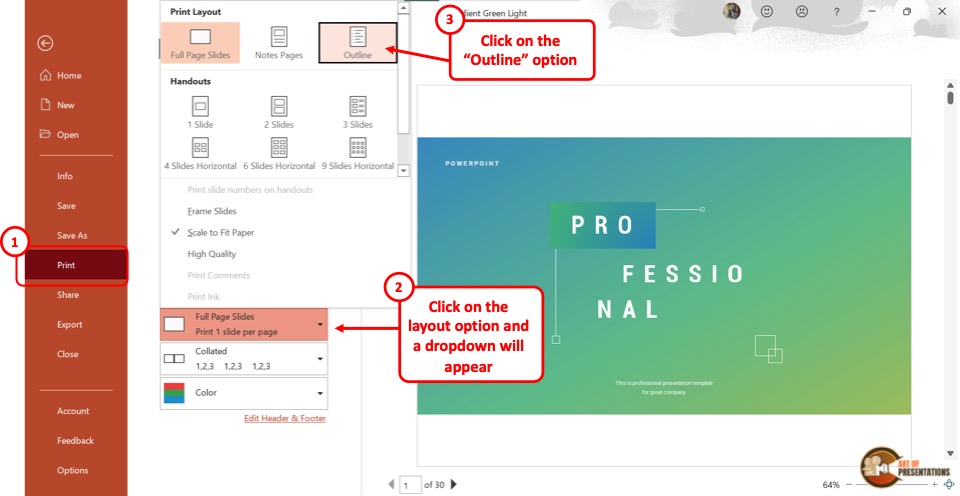
Under the “Settings” section, click on the box that says “Full Page Slides” . It will open a “Print Layout” pop-up menu. In the pop-up menu, click on the “Outline” option.

The presentation outline will appear on the preview screen.

Step-3: Click on the “Print” option

how to create a powerpoint presentation from an outline

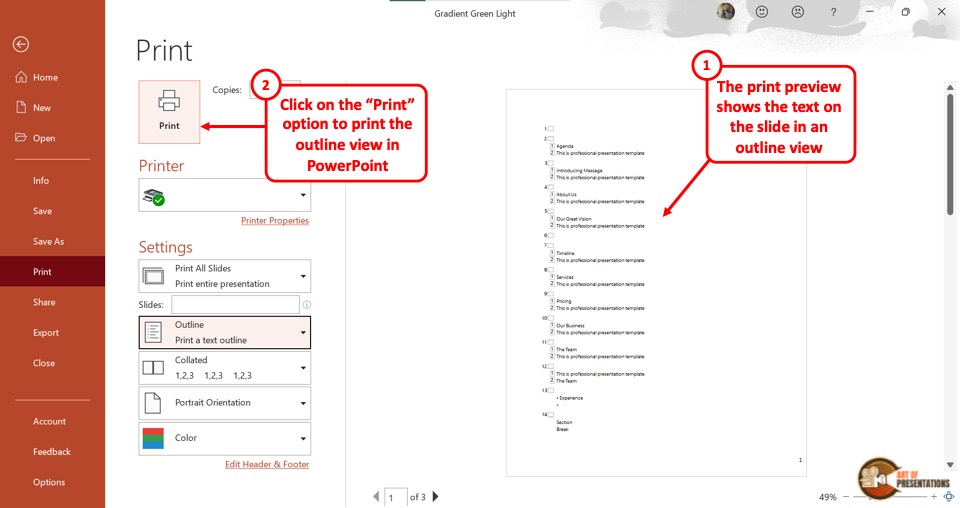
Finally, you have to make sure the device is connected to a printer. Then all you have to do is click on the “Print” button at the top of the screen.

11. How to Convert a Word Outline into a PowerPoint Presentation Using Outline View?

Microsoft PowerPoint allows you to import the outline from a Microsoft Word file. Importing an outline will automatically create slides for you. All you have to do is follow the 3 easy steps.

Step-1: Click on the “Slides from Outline” option

The first step is to click on the “Home” tab in the menu ribbon. In the “Slides” section of the “Home” menu, click on the “New Slide” option to open a dropdown menu.

Click on the “Slides from Outline” option from the bottom of the dropdown menu.

Step-2: Click on the “Insert” button

how to create a powerpoint presentation from an outline

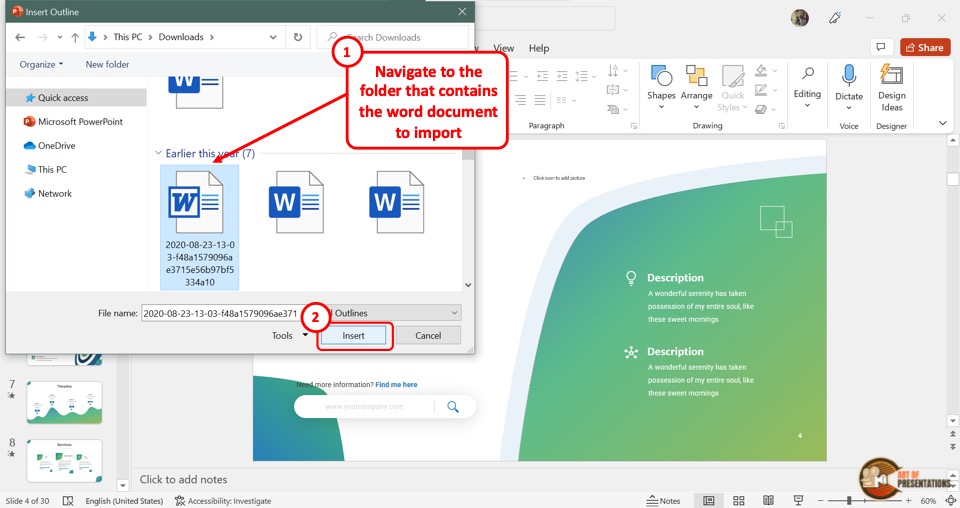
In the “Insert Outline” dialog box, click on the Microsoft Word document which you want to import. Then click on the “Insert” button at the bottom of the dialog box.

Step-3: Arrange the content

how to create a powerpoint presentation from an outline

Since the process automatically transforms the Word outline into a PowerPoint outline, the content may need some adjustments. If the Word outline does not have any headings, each paragraph will be converted into a slide.

To arrange them, “Right Click” on the content, and then click on the preferred option from the “Move Up” , “Move Down” , “Promote” and “Demote” options in the right-click menu.

12. Outline View Not Showing Text? Here’s Why!

In Microsoft PowerPoint “Outline View” , the text in the content placeholder is automatically shown in the outline. So when a slide has no content placeholder, the outline will not show any text.

To solve the problem, you will first need to add a placeholder in PowerPoint . Follow the steps mentioned below –

Step-1: Click on the “Slide Master” option

how to create a powerpoint presentation from an outline

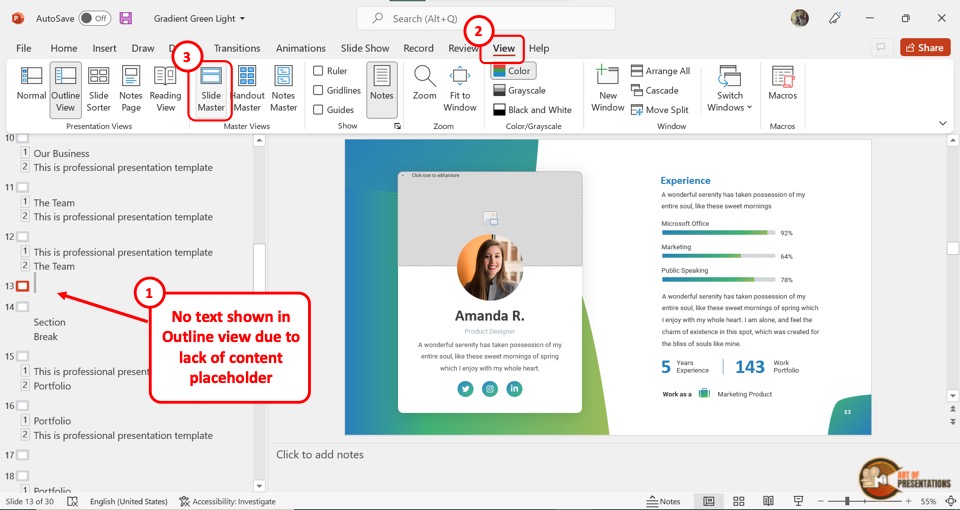
The first step is to open the slide where the “Outline View” is not showing any text. Then click on the “View” tab from the menu ribbon. In the “Master Views” section of the “View” menu, click on the “Slide Master” option.

Step-2: Click on the “Insert Placeholder” button

how to create a powerpoint presentation from an outline

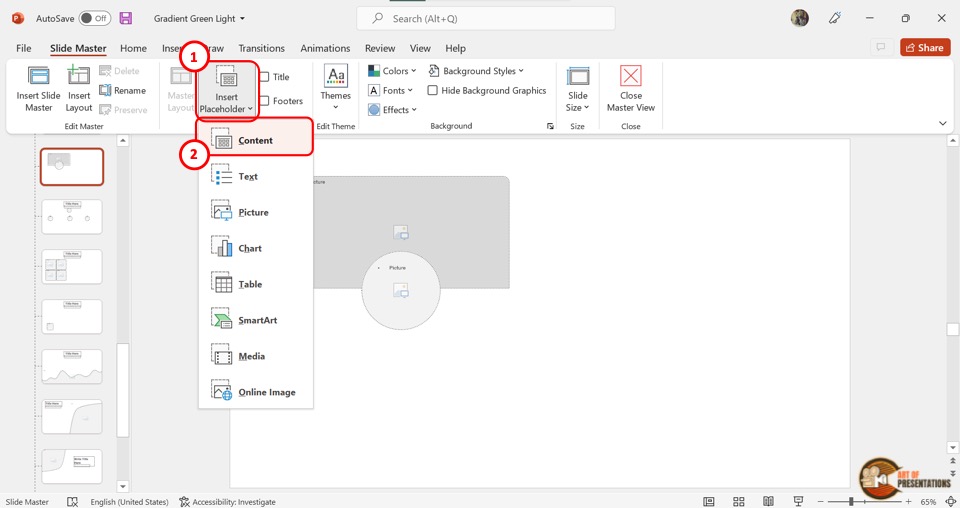
The next step is to click on the “Insert Placeholder” option in the “Master Layout” section of the “Slide Master” view. Then click on the “Content” option from the dropdown menu.

Step-3: Draw the “Content Placeholder”

how to create a powerpoint presentation from an outline

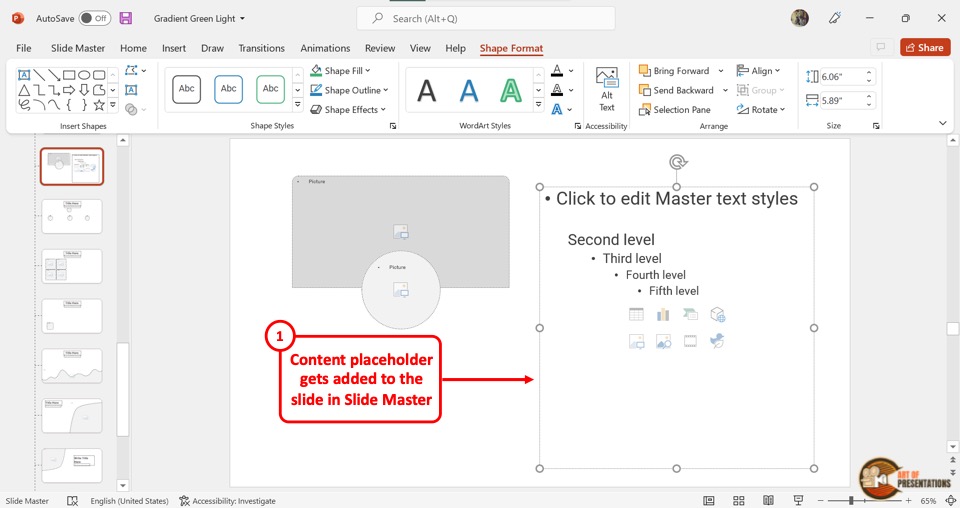
Now all you have to do is draw the “Content Placeholder” into the slide layout. You can also resize and reposition the placeholder.

Click on the “Shape Format” tab in the menu ribbon to access more options to edit the content placeholder.

Step-4: Click on the “Close Master View” option

how to create a powerpoint presentation from an outline

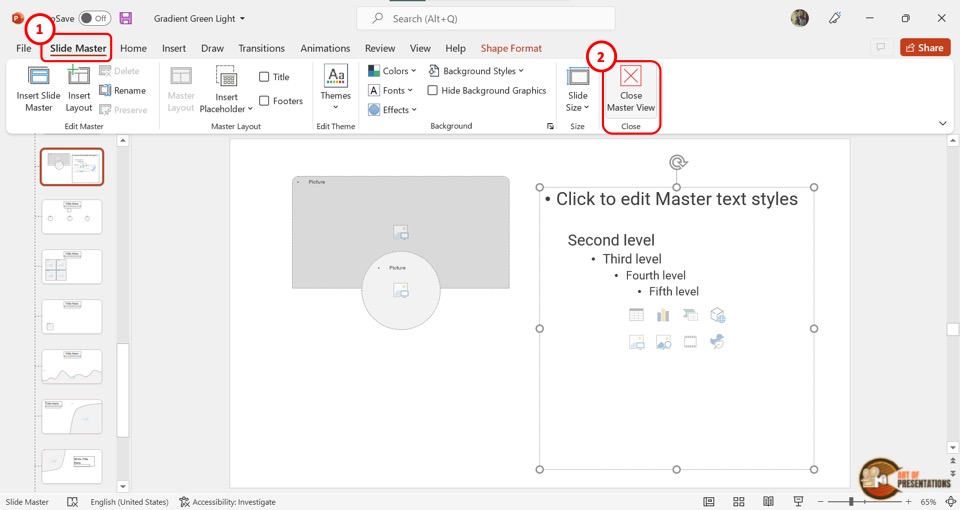
To save the content placeholder, click on the “Close Master View” option under the “Slide Master” tab. The screen will return to “Normal View” .

Step-5: Paste the text to the “Content Placeholder”

how to create a powerpoint presentation from an outline

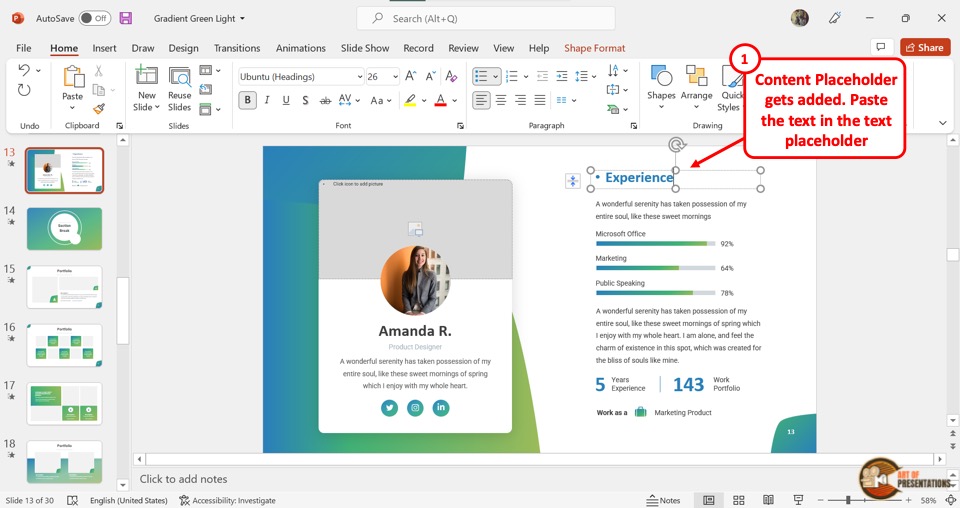
The final step is to cut the text in the slide and paste it into the “Content Placeholder” . To do so, select the text and press the “Ctrl+X” keys on your keyboard. Then click on the “Content Placeholder” and press the “Ctrl+V” keys.

Step-6: Click on the “Outline View” option

how to create a powerpoint presentation from an outline

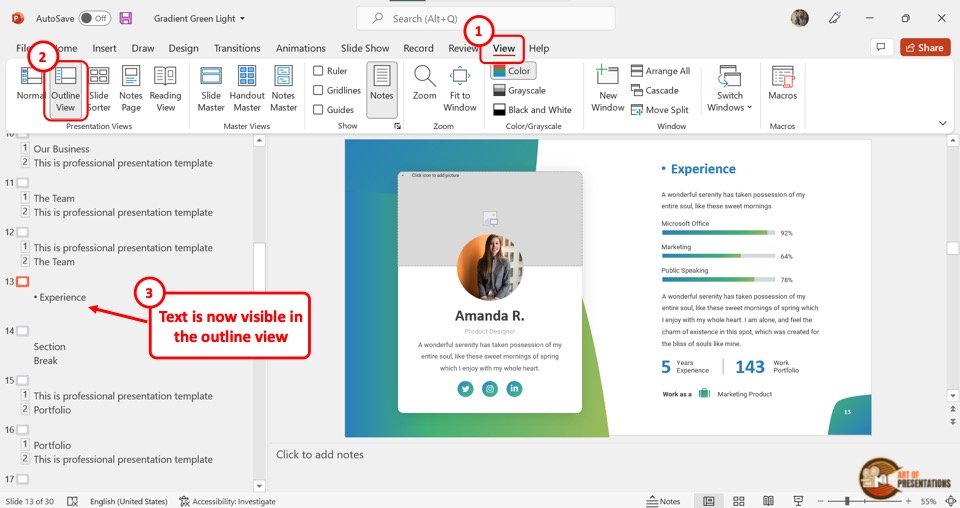
In the menu ribbon, click on the “View” tab and then click on the “Outline View” option. You will see that the text is now showing in the outline view.

Credit to Katemangostar (on Freepik) for the featured image of this article (further edited)

Critical PowerPoint Shortcuts – Claim Your FREE Training Module and Get Your Time Back!

nuts and bolts speed training logo

The Outline View in PowerPoint (Ultimate Guide)

  • PowerPoint Tutorials
  • Miscellaneous
  • December 5, 2017

This ultimate guide to the Outline View will catch you up to speed on the best ways to use the Outline View in PowerPoint.

There are a variety of different ways you can use the Outline View in PowerPoint to create, review and rearrange your content, all detailed below.

Table of Contents

What is the outline view in powerpoint.

It’s simply a way to view your presentation based solely on the text found within the content placeholders of your slides.

For example, you can see the difference between the views in the  SAME deck below – the one on the left is the Normal View (thumbnail view), the one on the right in the Outline View.

The normal view in PowerPoint compared to the Outline View in PowerPoint

And beyond simply showing the outline of your presentation, there are a number of tricks, shortcuts and PowerPoint hacks to BEND the Outline View to do your beck and calling.

You can slowly scroll down the page and soak up all of this PowerPoint goodness, or use the table of contents on the left to jump around to some of the advanced topics.

Switching to the Outline View in PowerPoint

There are three different ways to open (or switch to) the Outline View in PowerPoint, both described below.

Option #1. My favorite way to switch to the Outline View in PowerPoint is the CTRL + SHIFT + TAB   keyboard shortcut.

This shortcut opens and/or closes the outline view, displaying either the normal thumbnail view of your slides or the outline view of your content.

Outline View in PowerPoint - 2 Different Views

Notice how in the outline view (pictured above), instead of seeing the thumbnail preview of the slides (with the respective graphics) you only see the text that is in the  content placeholders .

And this makes a BIG difference!

The text you type into normal shapes and text boxes will NEVER show up in the Outline View, only the text that is the content placeholders that are set on the Slide Master.

Open the outline view #2

Click the normal view icon at the bottom of your PowerPoint work space to open the outline view

Another way you can open the outline view is by simply clicking the Normal icon at the bottom of your PowerPoint workspace.

  • Clicking the icon once will open the outline view (assuming your notes pane is already open)
  • Clicking the icon a second time will close the outline view, returning you to the thumbnail view.

If your notes pane is not open, you will need to click the icon an extra time before moving to the outline or thumbnail view.

Outline View NOT showing text?

Only text that is typed into content placeholders will show up in the outline view.

What’s a content placeholder?

Content placeholders are objects that you (or someone) set on the slide master of your presentation. These are objects like titles, subtitles and any other ‘type to add text here’ type of objects.

These types of placeholders can only be set on the Slide Master, and it’s only the text typed within these placeholders that shows up in the Outline View of your presentation.

So if you move to the Outline View (CTRL + SHIFT + TAB) and don’t see your slide’s text there, it means that your text is not in a content placeholder, it’s likely in a normal shape or text box that has been added to your presentation.

All of the other normal shapes and text boxes that you add to your presentation in the normal view, WILL NOT show up in the outline view of your presentation (no matter what you do).

Drafting an outline in PowerPoint

The MOST IMPORTANT keyboard shortcut to remember when drafting an outline in PowerPoint is:

New Slide Shortcut in PowerPoint, Ctrl plus Enter

Ctrl + Enter

This is your one stop shop for jumping between your content containers (regardless of how many you have) either in the Outline View or the Normal View of your presentation.

In the picture below you can see the different numbers in the Outline View on the left and follow the arrows to the right to see how they line up with the content containers on the right.

New Slide Shortcut in PowerPoint, Ctrl plus Enter

CTRL + ENTER allows you to jump between these containers without taking your hands off of the keyboard.

This shortcut works both in the Normal View in PowerPoint – jumping between content containers – and the Outline View in PowerPoint.

Once you run out of content placeholders to type text into, hitting CTRL + ENTER again gives you a new blank slide to work with.

Outline View Keyboard Shortcuts

Besides the CTRL + ENTER keyboard shortcut described above, there are a number of other Outline View shortcuts, most of which involve the ALT + SHIFT keys (making them easier to remember)

When using the Outline View shortcuts, remember that for most of them to work (like collapse groups ALT + SHIFT + 1 and expand groups ALT + SHIFT + 9) you need to rotate to the Outline View to activate it.

To rotate (or activate) the Outline View is to first open the outline view (CTRL + SHIFT + TAB) and then rotate active panes counterclockwise (SHIFT + F6).

If you are brand new to shortcuts, my advice is to just first start with the open/close Outline View shortcut (CTRL + SHIFT + TAB). If you are an intermediate to advanced user and will be frequently using this view, then it’s worthwhile learning how to activate and navigate this view entirely from your keyboard.

Resetting your text formatting

If for whatever reason you forget to paste your content as Text, you can always reset your slide (either in the Normal View or Outline View) to refresh your default formatting.

To do so simply select your text (or slides in the Normal View), navigate to the Home tab, and in the Slide group section select Reset .

To rest a slide layout and all of your content placeholders, from the Home tab click the Rest command

Resetting your slides does two things simultaneously:

  • It forces all of your content placeholders back into their original position, defined by their position on your Slide Master (this is useful if something accidentally gets moved out of place).
  • It forces all of your text back to its original text formatting, as defined by the Slide Master and Theme.

How to print the outline view in PowerPoint

Another overlooked feature of the Outline View is that you can print it.

This is useful when you have a large presentation and you simply want to see what it looks like based on the Titles, sub-titles and other content placeholders….basically your slides minus all of your graphics, pictures, etc.

To print your outline view, simply follow these steps.

1. Navigate to the Print Options

On your keyboard, hit CTRL+P to open up the print options for your presentation.

2. Navigate to the Outline View

Within the print options, select the ‘Full Page Slides’ dropdown (the default setting) and within the menu in the upper right-hand corner, select the Outline View.

Once the outline view is selected, you’ll see a print preview of your slides on the far right.

To print your outline, in the print dialog box select your print layout options and select Outline

As shown in the picture above, by default the Outline View is a default blank layout, but you can customize this as I will show you in the next section.

For additional help printing your PowerPoint slides as handouts, check out our guide here .

To learn how to convert your presentation outline into the PDF file format, see our guide here .

Customize the Outline View

If you frequently print the Outline View of your presentation, you can customize it with your own personalized branding (colors, logos, etc.).

This is particularly useful if you plan on sending the print out of the Outline View around. To customize your Outline View, follow these steps.

Step #1. Navigate to the Handout Master

There are two ways to do this:

  • From the view tab, select the handout master icon.
  • Holding the SHIFT key on your keyboard, click the slide sorter command at the bottom of your screen.

Two different ways to navigate to your Handout master, the View Tab and Handout Master command, or hold the Shift key and select the slide sorter view at the bottom of your screen

This Shift + Slide Sorter shortcut is a hidden shortcut.

2. Navigate to the Outline View framework

Within the Handout Master view, open up the slides per page drop-down.

So this is where you can select the different formats of your slides when printing them as handouts, depending on how many slides you plan to print per handout.

These options line up directly (plus some like the Notes Page ) with the handout print options available as showing in the picture below.

Showing a comparison of the handout views compared to the handout options in the Handout master

Within the drop down, simply select the Outline View at the bottom to open up the Outline View format.

On the handout master, open up the Slide Per Page drop down and select Slide Outline at the bottom

3. Customize your Outline View

Just like working with any normal slide, in this Handout Master Outline view, you can add your own personal customizations like your logo, design elements, extra text, etc.

In the example below I’ve added the Nuts & Bolt log in the upper right-hand corner and a simply gradient colored rectangle down the left-side of the page. You don’t have to do anything too fancy…a little effort will go a long way and shock most people.

Comparison between a blank outline format and a customized outline format

Using the Outline View in Word and PowerPoint

There are two ways to get an outline from Word into PowerPoint.:

  • Import the Outline from PowerPoint which allows you to add the slides to an existing presentation
  • Open the Outline directly in PowerPoint creating a brand new presentation

If you are using a Mac, you need to use the Rich Text file Format (.rtf). See instructions for how to do this on  Microsoft’s website here .

Import a Word Outline into PowerPOint

Importing your slides like this will add any new slides to the current presentation you are working in. Don’t worry, none of your other slides will be affected.

To learn about the common mistakes that happen when converting Word to PowerPoint, see our post here .

1. Navigate to the ‘Slides from Outline’ command

From within your presentation, navigate to the Home tab, open the New Slide drop down and at the bottom of the dialog select Slides from outline… to open the File Navigation dialog box.

To import an outline from Word, open the New Slide drop down and select Slides from Outline

2. Find your Word document

Within the dialog box, find your Word document and select ‘Insert’.

Navigate to the Word document with your outline in it and select Insert

To fix this, you need to use the Title style and Heading 1 styles in Word.

Comparison between a correct import and an incorrect import

Don’t forget to format your presentation

Importing an outline like this is a great way to jump start your presentation building process, but don’t stop here.

Your outline will always import in the most DEFAULT blank presentation style with only the Title and Content container slide layout.

This default look DOES NOT make for an effective presentation, so you will want to make sure to apply a theme and work on incorporating visuals like charts, tables, pictures, etc. to make your presentation more effective.

Opening an outline in PowerPoint

Instead of importing your outline, you can open your outline directly in PowerPoint to start a brand-new presentation.

To do so, follow these simple steps.

1. Go to the Open File dialog box

Within PowerPoint, either navigate to the File tab, Open and select Computer or on your keyboard simply hit CTRL + F12.

Open the Open File dialog box either by navigating to the File tab, click open and select Computer or just hit control plus the F12 key on your keyboard

Using either method, the navigation dialog box opens up.

2. Change the file type you are searching for

Within the Open File dialog box, in the lower right-hand corner change the file type you are searching for from PowerPoint files to All Outlines .

Change the file type you are trying to open from PowerPoint to All Outlines

3. Find your outline document

Find your outline document (I usually just save mine in Word) and click okay.

Note, if you are using a Mac, you need to save your Word document in the Rich Text File (.rtf) format.

If your outline is formatted correctly, your text will import correctly in the title and content container placeholders. If not formatted correctly, each line of text from your outline will import as its own individual slide.

Comparison between a correct import and an incorrect import (all based on the formatting in your Word document)

Final Thoughts

So those are all the different ways you can use the Outline View in PowerPoint to quickly build and edit your PowerPoint presentations.

If you end up using the Outline View a lot, I highly recommend learning the keyboard shortcuts for it. Shortcuts are the fastest way to double your productivity in PowerPoint (no joke).  For a full list of our favorite keyboard shortcuts in PowerPoint, read our guide here .

If you enjoyed the depth and detail of this blog post, you can learn more about boosting your PowerPoint skills with us here .

🔒 Unlock the PowerPoint Shortcuts Trusted by Industry Leaders KKR, American Express, HSBC, and More!

Join over 114,880 professionals from diverse fields including consulting, investment banking, advertising, marketing, sales, and business development who have supercharged their PowerPoint game with our proven methods.

✅ Customize compelling presentations effortlessly.

✅ Master time-saving techniques for faster deck creation.

✅ Boost your career prospects with top-notch PowerPoint skills.

Get FREE access to the Critical PowerPoint Shortcuts module of our premium training course by entering your name and email below.

DISCLAIMER: PC Users Only!

We respect your privacy and will keep your info safe and confidential.

Related Articles

About the author.

' src=

This Post Has 4 Comments

' src=

I apologize if this is obvious and I’m missing it.

But I don’t see anything about the browser-based version of Powerpoint.

Is that because the Outline feature simply does not exist there?

' src=

Hi Edward. Yes, unfortunately the Outline View does not exist in the online version of PowerPoint. It’s a very watered down version and I mostly use it to edit existing documents or present, rather that build out a presentation.

Wish I had a better answer for you, but thanks for the question.

' src=

I think you meant Ctrl+Shift+Tab rather than Alt+Shift+Tab, in your first mention of that shorcut. Thanks for the helpful article!

' src=

Yes, thank you for that (that was a typo on my end)! You are correct, Ctrl+Shift+Tab is the shortcut for the Outline View :). Cheers!

Comments are closed.

Popular Tutorials

  • How to Strikethrough Text (l̶i̶k̶e̶ ̶t̶h̶i̶s̶) in Word, Excel & PowerPoint
  • How to Make Animated Fireworks in PowerPoint (Step-by-Step)
  • Strikethrough Shortcut (l̶i̶k̶e̶ ̶t̶h̶i̶s̶) for Word, Excel & PowerPoint
  • How to Create a Flash Card Memory Game in PowerPoint (Like Jeopardy)
  • Keyboard Shortcuts Not Working: Solved

PowerPoint Tutorial Categories

  • Strategies & Opinions
  • Shortcuts & Hacks
  • Presentation Design
  • Pictures, Icons, Videos, Etc.
  • New Features
  • Charts & Data Viz

We help busy professionals save hours and gain peace of mind, with corporate workshops, self-paced courses and tutorials for PowerPoint and Word.

Work With Us

  • Corporate Training
  • Presentation & Template Design
  • Courses & Downloads
  • PowerPoint Articles
  • Word Articles
  • Productivity Resources

Find a Tutorial

  • Free Training
  • For Businesses

We help busy office workers save hours and gain peace of mind, with tips, training and tutorials for Microsoft PowerPoint and Word.

Master Critical PowerPoint Shortcuts – Secure Your FREE Training Module and Save Valuable Time!

⌛ Master time-saving expert techniques.

🔥 Create powerful presentations.

🚀 Propel your career to new heights.

We value your privacy – we keep your info safe.

Discover PowerPoint Hacks Loved by Industry Giants - KKR, AmEx, HSBC!

Over 114,880 professionals in finance, marketing and sales have revolutionized their PPT skills with our proven methods. 

Gain FREE access to a full module of our premium PowerPoint training program – Get started today!

We hate spam too and promise to keep your information safe.

You are currently viewing a placeholder content from Facebook . To access the actual content, click the button below. Please note that doing so will share data with third-party providers.

ShapeChef

  • Frequently Asked Questions (FAQ)

PowerPoint Tip: Start Your Presentation with an Outline

PowerPoint presentations are much like college essays. They present cited, relevant information that is meant to educate and inform. They are made for a wide audience. Do you remember what your teachers used to advise you to do when they assigned an essay writing assignment?

“Don’t forget to make an outline before you write.”

You can use the same concept in your next presentation. Just because it contains pictures and encourages interactivity doesn’t mean that it can’t be approached in a similar fashion. Outlining key points is a powerful strategy, and PowerPoint 2013 has a very useful tool to help you do it. This article will explain the importance of outlining and how to use the PowerPoint Outline View .

Why Create an Outline?

The answer is fairly simple: outlining focuses your presentation. It acts as a sort of pre-first draft, giving you leeway to throw ideas on the table and figure out which ones work best for your presentation. By putting everything you’ve thought of in one space, you can see your ideas and points side-by-side and more efficiently eliminate ones that don’t contribute to your overall message. By tightening the screws and oiling the gears, you will have a more cohesive presentation that works well both in presenting (on your end) and receiving (on the audience’s end).

PowerPoint Outline View

When you switch to Outline View in PowerPoint, you will see all the text currently within your title and text placeholders in a document-style format that appears on the left side of the screen. This will allow you to go through all the text and edit it without having to locate your text boxes one by one, slide by slide. It is a very useful tool to use when you want to focus on both text and image in a single go, consolidating your work from different areas of the screen.

Outline View in PowerPoint 2013

Outline View can easily be switched on and off by using the Ctrl+Shift+Tab key combination or via VIEW → Outline View .

PowerPoint Outline View Ribbon Button

Text typed in Outline View will appear in the title of the current slide. Press Enter to add a new slide. By pressing Tab the current item will be indented and become a subitem of the previous item. Shift+Tab removes the indentation. All of these features are also accessible via the context menu, which can be accessed by right-clicking an outline item.

Importing an Existing Outline

If you have already created an outline in Microsoft Word, you can easily convert it into PowerPoint slides. PowerPoint will use the heading styles that you assigned to your text in Word to determine which paragraphs are titles and which are content. Heading 1 lines will become slide titles, Heading 2 lines will become bulleted items on the slides, and Heading 3 lines will become sub-bulleted items.

To import an existing outline file, click the drop-down menu under New Slide on the HOME tab, and select Slides from Outline . Navigate to the outline file, and click Insert .

Import Slides from Outline in PowerPoint 2013

Another option is to create an outline in .txt format using Notepad (or any other text editor), as shown in the screenshot below.

PowerPoint Outline in Notepad

Normal paragraphs will be converted into slide titles, whereas paragraphs indented by tabs will result in bulleted lists.

All of the best presentations include three things: research, quality, and purpose. PowerPoint’s Outline View can help you achieve the quality work you desire as you create your presentation and impress your audience with your vision. By consolidating all of your important content into a single segregated window, you can more easily weed out the text you don’t want and refine the text you do want. That way, by the end, you’ll achieve your goal.

  • Presentation Tips and Techniques
  • April 25, 2016

About ShapeChef

ShapeChef: Graphic and Chart Library for PowerPoint

Blog Categories

  • Slides and Objects
  • Video and Audio

Copyright © 2024 Wulfsoft. All rights reserved.

  • Terms of Service
  • Legal Notice

How to Create a Presentation Outline: A Step-by-Step Guide with Examples

Master presentation outlines with our easy, step-by-step guide, complete with practical examples.

Why Should You Write a Presentation Outline?

  • Enhanced Focus: It helps keep you focused and prevents you from straying off topic.
  • Time Efficiency: You save time when creating the actual presentation because you have a clear plan to follow.
  • Audience Engagement: A well-organized flow helps maintain the audience's interest throughout the presentation.
  • Stress Reduction: Having a structured plan in place can significantly lower anxiety by making you feel prepared.

Method 1: Create Your Outline from Scratch

  • Identify Main Points: Begin by determining the three to five central messages you wish to convey. These should form the backbone of your presentation.
  • Support with Details: For each main point, include supporting sub-points or data. This might consist of statistics, case studies, or other relevant information that reinforces your primary arguments.
  • Introduction and Conclusion: Craft an engaging introduction that captures your audience's attention right from the start. You might use a striking statistic or a pertinent quote to do this. Conclude with a strong summary of the key takeaways and a compelling call to action.
  • Introduction: Begin with a surprising statistic or a relevant quote to grab attention.
  • Main Point 1: The importance of digital literacy.
  • Sub-point: Provide current statistics on global digital literacy rates.
  • Sub-point: Discuss a case study on successful digital education programs.
  • Main Point 2: The benefits of improving digital literacy.
  • Sub-point: Highlight economic benefits.
  • Sub-point: Discuss social implications.

Method 2: Use an AI Presentation Maker

  • Provide a Prompt: Enter a brief description of your presentation topic into the AI tool.
  • Customize the Output: Examine the generated outline. You may need to modify the titles of the slides and their order to better suit your needs.
  • Generate Presentation: Utilize the tool to transform the outline into a preliminary draft of your presentation.
  • Introduction to Renewable Energy
  • Benefits of Renewable Energy
  • Challenges and Solutions
  • Case Studies
  • Conclusion and Future Outlook

Method 3: The Mind Mapping Technique

  • Central Idea: Begin by placing the central topic of your discussion at the center of your map.
  • Branch Out: Extend branches from the central idea to outline each primary point or theme.
  • Sub-branches: Append sub-branches to these main branches to include supporting details, examples, and data.
  • Visual Elements: Incorporate colors, symbols, and images to highlight and distinguish various ideas.
  • Importance of Sustainability
  • Strategies for Implementation
  • Future Trends
  • Green Energy
  • Waste Management
  • Sustainable Supply Chains

Method 4: The Storyboard Approach

  • Sketch Scenes: Draw or describe each slide or section of your presentation as a panel in a storyboard.
  • Narrative Flow: Arrange the panels to ensure a logical progression of ideas.
  • Detailing: Add notes for key points, transitions, and how you plan to engage the audience.
  • Feedback: Review and rearrange the panels as needed to improve storytelling and impact.
  • Panels: Introduction, Definition of Key Terms, Benefits, Challenges, Solutions, Case Study, Conclusion
  • Details for 'Benefits' Panel: List of major benefits, supporting statistics, visual graph

Method 5: The Reverse Engineering Method

  • Define Objective: Clearly state what you want your audience to learn or do after your presentation.
  • Outcome-based Sections: Create sections that directly contribute to achieving the objective.
  • Supporting Information: Add information that reinforces each section.
  • Logical Sequence: Arrange sections in a way that naturally leads to your conclusion.
  • Objective: Convince stakeholders to invest in renewable energy.
  • Sections: Introduction, Benefits of Renewable Energy, Investment Opportunities, Success Stories, Call to Action

Method 6: The Comparative Layout

  • Identify Topics: List the topics or elements you will compare.
  • Comparison Criteria: Define the criteria or parameters for comparison.
  • Matrix Setup: Set up a matrix or table in your outline to systematically compare each element.
  • Conclusions: Summarize insights or recommendations based on the comparison.
  • Topics: Traditional Marketing vs. Digital Marketing
  • Criteria: Cost, Reach, Engagement, ROI, Adaptability
  • Matrix: Create a table with criteria as rows and marketing types as columns, filling in details for each.

How to create a Presentation from an Outline?

How to use ai to create presentations from outline.

  • Install MagicSlides Extension: Start by installing the MagicSlides extension from the Google Workspace Marketplace.
  • Open Google Slides: Launch Google Slides where you’ll create your presentation.
  • Activate the Extension: Open the MagicSlides extension within Google Slides.
  • Enter Presentation Details: Input the topic of your presentation and specify the number of slides you need. This helps MagicSlides understand the scope of your presentation.
  • Customize Your Content: You can also input specific text you wish to include on your slides. This step is optional but helps in personalizing the slides to better fit your presentation's theme and content.

Tips for Great Presentations

  • Visual Appeal: Use high-quality images and consistent fonts.
  • Conciseness: Keep slides concise; aim for no more than six words per bullet point.
  • Engagement: Incorporate stories or questions to engage the audience.
  • Practice: Rehearse your presentation multiple times to ensure smooth delivery.

Create PPT using AI

Just Enter Topic, Youtube URL, PDF, or Text to get a beautiful PPT in seconds. Use the bulb for AI suggestions.

character count: 0 / 6000 (we can fetch data from google)

upload pdf, docx, .png

less than 2 min

Sanskar Tiwari

Sanskar Tiwari

Founder at MagicSlides

How to change shape of picture in PowerPoint

How to update PowerPoint

How to group shapes in PowerPoint

30 April 2024

What do text boxes allow you to do in a PowerPoint Presentation?

How to use copilot in PowerPoint

29 April 2024

How to change master slide in PowerPoint

5 AI PowerPoint Generators Who Are Transforming Presentation Creation

How to flip a shape in PowerPoint?

26 April 2024

Stunning presentations in seconds with AI

Install MagicSlides app now and start creating beautiful presentations. It's free!

App screenshot

Get AI-Generated Presentations Ready in Seconds

Free AI PPT Tools

Icon 1

FPPT

How to Create a PowerPoint Presentation from an Outline in Word

Last updated on April 1st, 2024

There are many reasons for you to want to convert a Word outline into a PowerPoint presentation. For example, in the academic or even in the corporate setting, you may have taken notes about a meeting using Word and you want to present this as a slideshow after filling the slides up with relevant information. You may also be brainstorming with your team and now you want those major points in your session to be fleshed out and turned into an informative and relevant presentation. Let us show you how to create a PowerPoint presentation from an outline in Word.

Other reasons may be because you are more comfortable using Word than PowerPoint. You may also be in a rush and would want your notes to be converted into a slideshow, but you don’t have enough time. Well, worry not. You can actually create presentations out of your outlines without necessarily using a conversion app or downloading a program. All you need is Microsoft Office’s suite of applications and you’re good to go.

Find Your Outline Transformed into a Slideshow

Import a Word Outline into PowerPoint

So, how to turn an outline into a PowerPoint presentation? To start this process of creating a PowerPoint presentation from an Outline in Word, you first have to open your Word document. This tip works on all Word versions, as the outline feature has been around for quite a long while.

Create a PowerPoint Presentation from an Outline in Word

So, in Word, go to the View tab in the Ribbon. Click on Outline . Now, you will see that your long lines of text are organized into a neat list, which is actually your document outline. You will see headers and subheaders listed and in different, distinct bullet points or numbered lists, whichever you used in your document as you typed it up.

Outline View of Document

You can go ahead and select the main headers, or the first level of the outline. Just hold down CTRL as you select the particular lines you want as level 1. This ensures that you can select multiple separate lines. Once you’re done, just go to the Outline Tools under the Outlining Tab. Click on Level 1 .

Now, this is what will be your slide titles later on. Then, you can make the rest as Level 2 following the same procedures. These level 2 items will be your bulleted lists corresponding to each slide. Then, save your file.

Assign Levels to Your Text

Make the Outline Show Up in Your PowerPoint Slides

Now, to convert this Outline to PowerPoint, you have to open a blank PowerPoint. Then, select New Slide -> Slides from Outline . The Open dialog box will prompt you to select the Word document wherein you have created your outline for the presentation. Look for this file, select it, and click the  Insert button.

Insert New Slides from Outline

This Insert function will automatically insert your Outline in the same order. However, since it’s on PowerPoint, every Level 1 item you have assigned in Word will now be the title of each slide. The level 2 items will also be automatically included under its corresponding headers. You will see that slides and bullet points are instantly created, making your job so much easier. From here, you can just create minor tweaks. You can also add more information into each slide. The main thing is, your blueprint for your presentation is already done, so you have more time focusing on making your slides more attractive and informative. Just remember that if you apply the Normal style to any text in Word, it won’t be included in the Outline function in PowerPoint. Therefore, be sure to assign the right levels to the text you want to include in your slideshow.

You can also create a PowerPoint presentation from an outline in a text file . We have covered this approach in a separate article.

Leave a Comment Cancel reply

Your email address will not be published. Required fields are marked *

Save my name, email, and website in this browser for the next time I comment.

Sign up to our newsletter

We will send you our curated collections to your email weekly. No spam, promise!

how to create a powerpoint presentation from an outline

August 13, 2024

How to create a presentation outline (with examples)

Four methods to create a presentation outline and example outlines for inspiration

Co-founder, CEO

Like it or not, if you work in an office or go to school, you'll probably have to make a presentation sooner or later. But creating a great presentation can be challenging, especially if you're short on time or suffering from writer's block.

Luckily, there are many ways to get a head start on your presentation outline. In this article we'll walk through four options for creating a presentation outline and show you several examples of great presentation outlines.

Why should I write a presentation outline?

An outline helps you organize your ideas in a clear and logical way . Instead of getting bogged down on details like formatting or word choice, an outline presents the overarching story of your presentation with just a few main points. This helps to make sure you have a cohesive narrative before you dive into the nitty gritty work of wordsmithing individual bullet points or selecting the perfect slide theme.

If this sounds like a lot of work, it often is! But spending time writing a great outline will save you time and effort down the road because it will be easier to organize your work and create each slide when you understand how it fits in to the broader presentation.

Here are four ways you can get a start on creating your next presentation outline.

Method 1: Create your outline from scratch

Creating an outline from scratch may sound intimidating if you have never written a presentation outline before, but this is the most straightforward way to get started.

Start by jotting down the three main points you want to make in your presentation. Once you have your main ideas in order, write down a few supporting details and examples for each point.

Then, add an introduction (find an interesting image, quote, or question to help grab the audience's audience) and a conclusion (decide on the best way to summarize the takeaways from your presentation) to the outline, and you are ready to go.

This method is great for those who prefer to have complete control over their presentation and want to create a custom outline that works best for their needs.

Method 2: Create a presentation outline using an AI presentation maker

If you're short on time or looking for a quick way to get a first draft of a presentation outline that you can then refine, using an AI presentation maker is a great option.

Plus AI lets you type a short prompt like "Create a presentation that provides an overview of the Norwegian oil industry," and it will automatically generate an outline of a presentation for you. After Plus creates the outline, you can change the titles of slides, rearrange slides, and remove any pieces of the outline that are not necessary.

how to create a powerpoint presentation from an outline

From there, once your outline is created, you can click the "Generate presentation" button, choose a template, and let the AI create the first draft of your entire presentation.

This method is a good option for those who want to create a polished presentation without getting stuck with a blank piece of paper. Instead, it frees you up to take a first draft presentation and customize it for your needs.

Method 3: Create a presentation outline using ChatGPT

ChatGPT is an AI chatbot that can help with a wide variety of tasks - everything from acting as a therapist, to sharing recipes, to helping you come up with presentation ideas and creating content for a presentation .

To have ChatGPT help you generate a presentation, you can take two different approaches:

  • Use a custom GPT that has been trained to help people create presentations or
  • Ask the general ChatGPT interface to "Create a presentation outline for me on the topic of [XYZ]."

Both approaches will yield similar results, but a custom GPT like Plus AI presentation maker will be more fine-tuned to helping people create presentations. It will also provide additional functionality like providing a visual preview of the slides and feedback on how to improve your presentation.

Method 4: Create a presentation outline using a template

Last but not least, using a template is a good way to speed up the process of creating a new presentation outline. Similar to using an AI presentation maker, a template can give you a first draft of an outline that is easier to edit and refine than starting from scratch.

Presentation templates often come pre-designed with example text and images, so all you have to do is fill in your own content. For example, this TED Talk presentation template provides some instructions on how to create an outline for a TED Talk-style slide deck.

The secret to using this method is to find the closest template to the type of presentation you want to create. You should use detailed search terms to and look across multiple sites and resources to find one that matches the content and style that you would like.

Once you have your template, start by reviewing the overall outline or structure and tweak it to meet your needs. Then, you can fill in the specific content (e.g., text and images) with your materials to make it your own to quickly make a beautiful presentation.

Presentation outline examples

Basic presentation outline example.

Let's take a look at a presentation outline and accompanying notes for a persuasive presentation on encouraging people to meditate every day:

I. Introduction

  • Hook - find a striking image and tell a story
  • Thesis statement - everyone should meditate for 10 min per day

II. Main point 1 - Meditation is one of the easiest ways to improve your health

  • Physical health
  • Mental health

III. Main point 2 - Meditation is backed up by thousands of years of practice and research

  • One anecdote from antiquity
  • One anecdote from recent research

IV. Main point 3 - You can get started with meditation today

  • Basic technique
  • Tips for newcomers

V. Conclusion

  • Summarize key points
  • Call to action

As you can see, this is a relatively lightweight plan for the presentation, but it provides an easy-to-understand framework that we can fill in with slides.

There are rough notes on specific content for the different points in the presentation, but we don't need to write out everything in fine detail, just the broad strokes.

Pitch deck outline example

Now let's review an outline for a pitch deck that someone might use to present their startup idea to prospective investors. This is for a startup that uses autonomous food trucks to deliver meals to people's homes and workplaces.

I. Problem statement - "Food delivery sucks, and here's why"

  • Hook - pictures of typical food delivery headaches (e.g., late/no show, bad selection, etc)

II. Value prop - "FoodDrive revolutionizes the food delivery model"

  • Compare value chain of FoodDrive to traditional restaurant and delivery service
  • Show how $50 order gets allocated to different people

III. The product - "Customers love our trucks"

  • Picture of food truck and menu
  • Customer quotes and reviews

IV. Why now? - "Our self-driving technology is ready for prime-time"

V. Business model - "Each truck can generate $2-3M of revenue per year with a 60% gross margin"

  • Show high-level financial forecasts on unit basis

VI. Competitive landscape - "FoodDrive's closest competitors don't come close"

  • Comparison table with delivery services, in-house delivery, eating out-of-home, etc.

VII. Go to market strategy - "We've tested FoodDrive in 2 markets so far. Here's how we win in new markets"

  • Overview of social media strategy
  • Case study on new market launch

VIII. Team - "Our team has experience in autonomous vehicles, food delivery, and quick service restaurants"

IX. Traction - "We generate $5M of revenue per year with our 2 trucks, and we can ramp up new trucks immediately"

  • Show revenue growth chart with focus on time to ramp new trucks to productivity

X. Fundraising goal - "We are raising $50M to expand FoodDrive to 10 more markets"

  • Highlight key milestones we aim to reach with additional funding

Even though a pitch deck is a specialized type of presentation that often requires specific content, it's helpful to start with an outline to build out the 'story' behind the content. That way, you have a cohesive story rather than a set of disparate slides.

How can I create a presentation from an outline?

Once you have your presentation outline written, it's time to start writing your slides. Since you already know the main points you are trying to make in your presentation, the main decisions here are

  • What type of visual style you want to follow
  • How many slides you want in your presentation
  • How you will present or share the slides

To get a head start on creating a first draft of your presentation, you could enter your outline into an AI presentation maker.

This will provide a first draft of the slides so that you can focus on making sure they tell a cohesive story or tweaking individual slides to leave a memorable impression.

Other tips and tricks for great presentations

Here are some resources to help you create great presentations:

  • Make slides look good - Here are six tips for making visually appealing slides.
  • Number of slides - Here is a calculator that can help you calculate how many slides you need for a presentation depending on how long you need to present.
  • Unique presentation ideas - Here are 250 ideas for presentation topics that will help you create a great presentation.

Creating a presentation outline can be one of the most time-consuming parts of the creative process for making a new slide deck. Luckily, there are many tools and templates that can help you kickstart this process.

With these four methods, you can choose the one that works best for your needs and get started on your presentation outline today.

And once you have your outline, make sure to try out a tool like Plus AI presentation maker to quickly get your slides as well!

Latest posts

Latest post.

how to create a powerpoint presentation from an outline

Announcing Plus AI for PowerPoint

The Plus AI PowerPoint add-in brings Plus AI to the Microsoft 365 ecosystem and offers new ways for teams and individuals to create PowerPoint presentations using AI

how to create a powerpoint presentation from an outline

PowerPoint Karaoke: Rules, tips, and free slide decks

Overview of PowerPoint Karaoke, rules, and free slide decks for PowerPoint Karaoke

how to create a powerpoint presentation from an outline

How to use ChatGPT to create a PowerPoint

Looking for ChatGPT for PowerPoint? Here's a step-by-step guide to using AI in PowerPoint and Google Slides

More resources

How to check word count on google slides.

How to get the word count of a Google Slides presentation

how to create a powerpoint presentation from an outline

How to create a great onboarding presentation

Need help creating a presentation for your new employees? Our guide walks you through how to create a great onboarding presentation from start to finish.

How To Wrap Text In Google Slides: A Quick Guide

A step-by-step guide on how to wrap text in Google Slides and how to save time on formatting with Plus AI

A step-by-step guide to captivating PowerPoint presentation design

november 20, 2023

a dark pink colored circle logo with corporate powerpoint girl in the center of it

by Corporate PowerPoint Girl

Do you often find yourself stuck with a lackluster PowerPoint presentation, desperately seeking ways to make it more engaging and visually appealing? If your boss has ever told you to "please fix" a presentation and you didn't know where to start, you're not alone. In this article, we'll walk you through a straightforward method to transform your PowerPoint slides into a visually captivating masterpiece. 

Let's dive right in! 

Clean up your slides 

The first step in this journey to presentation excellence is all about decluttering your slides and elevating their impact. Say goodbye to those uninspiring bullet points that often dominate presentations. Instead, focus on what truly matters – the key call-out numbers. By increasing the font size of these numbers, you ensure they take center stage, immediately drawing your audience's attention. 

To make those numbers pop, consider breaking the text after the numbers into the next line and adding a touch of color. The contrast created by pairing a dark color with a lighter shade, like dark teal and light teal or burnt orange with peach, can work wonders. This simple adjustment makes your data more engaging , enhancing the overall impact of your presentation. 

Add dimension with boxes 

Now, let's introduce an element of depth and organization to your slides. By adding boxes, you'll create a visually pleasing structure that guides your audience through the content. In the "Insert" menu, select "Table" and opt for a one-by-one table. Change the table color to a light gray shade, elongate it, and position it neatly to the left of your text. 

To improve readability and aesthetics, increase the spacing between text phrases. A small adjustment in the before spacing setting (setting it to 48) significantly enhances the visual appeal of your slides. 

Insert circles 

To further enhance the visual appeal and engagement of your slides, let's introduce circles. In the Insert menu, navigate to Shapes and choose the circle. Adjust the circle's height and width to 1.2, ensuring it complements your content seamlessly. Match the circle's shape fill color with the corresponding text color for a harmonious look. 

Avoid using colored outlines for the circles, as they may distract from the overall aesthetic. This simple addition of circles adds an element of visual interest to your presentation, making it more captivating. 

Choose icons 

Now, it's time for a touch of creativity. Selecting icons to complement your text can elevate the clarity and appeal of your slides. In the "Insert" menu, you can search for relevant keywords to find the perfect icon from PowerPoint's extensive library . 

For instance, if your text discusses investment portfolio yield, search for "growth" and choose an upward arrow growth icon. These icons add an extra layer of visual appeal and clarity to your content, making it more engaging and informative. 

Final touches 

To wrap up the transformation process, we come to the final touches that give your presentation a polished, professional finish. Align your icons with their corresponding circles and change the shape fill color to white. This simple adjustment creates a crisp, cohesive look that ties everything together seamlessly. 

In conclusion, by following these steps, you've embarked on a journey to enhance your PowerPoint presentation . These initial steps are just the beginning of your exploration into the world of design elements and styles that can cater to your specific presentation needs. The key to a stunning PowerPoint presentation lies in the details. By following these steps, you can turn a lackluster set of slides into a visually engaging and dynamic presentation that will captivate your audience. So, the next time your boss says, "Please fix," you'll know exactly where to start. Happy presenting! 

Related topics

PresentationSkills.me

How To Turn Powerpoint Into Outline

how to create a powerpoint presentation from an outline

Do you want to turn your PowerPoint presentation into an outline? You can do it easily by utilizing a built-in feature in PowerPoint. Keep reading to find out the steps to creating an outline from your PowerPoint presentation.

Step 1: Click On The “File” Tab

First, you will need to open up the PowerPoint presentation from which you want to create an outline. Click on the “File” tab in the upper left-hand corner of the screen.

how to create a powerpoint presentation from an outline

Step 2: Select “Export”

Upon clicking “File”, new options will appear. Click on “Export” from the options in the File tab.

how to create a powerpoint presentation from an outline

Step 3: Create Handouts

Click “Create Handouts” under the Export tab then press the “Create Handouts” icon.

how to create a powerpoint presentation from an outline

Step 4: Select “Outline Only”

A popup will appear after clicking on the “create handouts” button. Select the “Outline Only” option and press “Ok”.

how to create a powerpoint presentation from an outline

That’s it! Once you do so, PowerPoint will generate an outline, and it will open in the MS Word program. If you want to make edits to the outline, simply make them in Word and then save the document. We hope you found this helpful. Thanks for reading!

As you see, it’s quite easy to turn your presentation into an outline using PowerPoint’s built-in feature. All you need to do is follow the steps that are outlined in this article. Thanks for reading!

Related Posts:

How To Turn Off Suggestions On Google Docs

Google Slides

Create Effective Presentation Outlines: A Step-by-Step Guide with Tips & Examples

Create Effective Presentation Outlines: A Step-by-Step Guide with Tips & Examples

Table of Contents

What is a presentation outline.

A presentation outline is like a roadmap for organizing your thoughts and delivering your message smoothly during a presentation. It helps you structure your content logically, ensuring that your audience can follow along easily. By providing a clear framework, an outline enhances the clarity and effectiveness of your presentation.

Importance of Presentation Outline  

1. Clarity and Focus

Using an outline keeps your presentation organized and focused, preventing you from going off track. It ensures that your presentation has a clear purpose and that all the information you share is relevant to your main points.

2. Logical Structure

A well-crafted outline ensures that your presentation flows logically, guiding your audience smoothly from one point to the next. This helps your audience follow your train of thought and understand your message more easily.

3. Enhanced Delivery

Having a clear outline can boost your confidence and make your delivery smoother. With a structured plan, you’re less likely to forget important points or ramble on, resulting in a more professional presentation.

4. Time Management

An outline helps you manage your time better by estimating how long each part of your presentation will take. This ensures that you stay within the allotted timeframe, keeping your presentation on track and engaging for your audience.

women with mic and notes presenting

Create presentation slides with AI in Seconds in Google Slides

10M+ Installs

Works with Google Slides

slidesai

How to Build Strong Presentation Outline s?

1. Purpose of Presentation

Understanding why you’re giving your presentation is crucial for planning its structure. Identifying your goal means thinking about what you want your audience to get out of it. This clarity forms the basis of your whole presentation. There are six potential reasons you might be presenting:

  • Sharing information
  • Teaching something new
  • Making it enjoyable
  • Inspiring action
  • Convincing people of something
  • Motivating them

Thinking about your goal will help you make a presentation that really grabs attention. Answering these questions can help you figure out what your goal is:

  • What do I want people to learn or understand from my presentation?
  • How will my presentation make a difference to those listening?
  • What do I want people to do after my presentation?

Once you have the answers, you’ll have a good idea of what your presentation should cover and where to start.

2. Consider Color and Design

How you present your pitch matters just as much as what you say. Take a moment to think about the fonts and colors you’ll use on your slides. Research suggests that red can convey excitement and grab your audience’s attention, while white gives off a sense of simplicity and clarity.

3. Establishing Structure: Arrange Your Ideas in a Logical Order

When crafting your presentation, it’s important to structure your ideas in a clear and logical sequence. Start with an introduction to set the stage, followed by the main body where you delve into your key points, and wrap it up with a conclusion to summarize your main ideas.

4. Engaging Your Audience

When you’re getting ready for your presentation, think about how you can start off in a way that grabs everyone’s attention. You could ask a thought-provoking question, share an interesting story, or begin with a meaningful quote. The main thing is to get your audience interested right from the beginning and set the tone for the rest of your talk.

5. Adding Visuals

Give some thought to whether you want to include pictures, videos, or other visual stuff in your presentation. Even if your outline doesn’t mention exactly what visuals to use, you can suggest where they might fit in to help explain your ideas.

6. Encouraging Action

Come up with a clear and compelling message to encourage your audience to take action. Whether it’s encouraging customers to try out a new product or inviting people to join a demo, make sure they understand what’s in it for them. And if your presentation doesn’t really need a specific call to action, just wrap up by summarizing your main points and saying thanks for listening.

Alternatively, you can skip the hassle of crafting a presentation outline manually – try SlidesAI for seamless assistance .

women presenting in frint of business leaders

Strategies for Crafting an Engaging Presentation

1. Understanding Your Audience

Take some time to know your audience by researching beforehand. This helps you adjust your presentation to connect with them better.

2. Enhance with Quotes, Testimonials, or Data

Make your presentation more interesting by adding extra info like quotes, testimonials, or data. It can make your audience more engaged and reinforce your message.

3. Visualize Your Concepts

How you show your ideas matters a lot. Tools like SlidesAI can help you express your concepts clearly and effectively.

4. Highlight Key Takeaways

Figure out the most important points you want your audience to remember. This makes it easier for them to recall and understand your message.

5. Seek Feedback

Ask for feedback to improve your presentation. It’s a good way to make sure it connects better with your audience.

Presentation Outline Example

Topic: The Impact of Social Media on Mental Health

Target Audience: College students

Time Limit: 15 minutes

I. Introduction (2 minutes)

Attention Grabber : Briefly discuss a real-life example of how social media can negatively impact mental health (e.g., cyberbullying, unrealistic beauty standards).

Introduce the topic : Clearly state the topic and its significance (e.g., “Today, I’ll be talking about the increasing impact of social media on mental health, particularly among young adults like yourselves”).

Preview : Briefly outline the key points that will be covered (e.g., “We’ll explore the positive and negative aspects of social media use, discuss common mental health concerns associated with it, and offer some tips for healthy social media habits”).

II. Main Body (10 minutes)

Positive aspects of social media:

Connection and community : Highlight how social media can help people connect with friends and family, build communities based on shared interests, and combat feelings of loneliness.

Information and self-expression : Discuss how social media can be a source of information, news, and inspiration, and provide a platform for self-expression and creativity.

Negative aspects of social media:

Social comparison and envy : Explain how constant exposure to curated online profiles can lead to social comparison, feelings of inadequacy, and envy.

Cyberbullying and harassment : Discuss the prevalence of cyberbullying and online harassment, their potential to significantly impact mental health, and the importance of online safety.

Addiction and anxiety : Explain how excessive social media use can lead to addiction, anxiety, and sleep disturbances.

III. Conclusion (3 minutes)

Summary : Briefly recap the key takeaways discussed in the presentation.

Call to action : Encourage the audience to be mindful of their social media usage and offer practical tips for developing healthy habits, such as setting time limits, curating their feed, and prioritizing real-life interactions.

Question and Answer : Allocate time for audience questions and address them thoughtfully.

  • No design skills required
  • 3 presentations/month free
  • Don’t need to learn a new software

slidesai

This is just a sample outline, and you can adapt and modify it based on your specific topic, audience, and time constraints. Remember, a well-structured and engaging presentation will effectively communicate your message and leave a lasting impression on your audience.

Frequently Asked Questions

How can ai help you create a presentation outline .

With the assistance of AI tools like ChatGPT and Gemini, crafting outlines becomes a breeze. Furthermore, you can utilize user-friendly online AI presentation tools such as SlidesAI to effortlessly generate your presentations.

Why is putting your outline on a slide a good idea?

Using a presentation outline can be helpful. It makes things clearer, boosts the speaker’s confidence, and helps manage information better. It also keeps the audience more engaged. But, if your presentation is fast-paced, casual, or focused on a specific area of expertise, you might want to keep the outline short and sweet. Just pick what works best for your situation and audience.

What is the format of the presentation outline?

There are various formats, but a common approach is using bullet points, numbered lists , or headings and subheadings. Choose the format that best suits your content and visualizes your information.

How can I adapt my presentation outline for different audiences?

Adapt your presentation outline by tailoring:

  • Content : Depth, complexity, and examples based on audience expertise.
  • Language : Formality, jargon, and storytelling to match audience and occasion.
  • Visuals : Complexity and style to suit audience understanding.
  • Delivery : Pace, volume, and even body language to audience energy.
  • Focus : Highlight information most relevant to specific interests.

How long should a presentation outline be?

There’s no set rule; it depends on the complexity of your topic and presentation length.

Can I use a mind map to create a presentation outline?

Yes, mind maps can be a good way to visually brainstorm and organize presentation ideas.

What tools can I use to create a presentation outline?

You can use pen and paper, a word processing software like Microsoft Word, or dedicated outlining tools. Presentation software like PowerPoint also offers built-in outlining features.

Save Time and Effortlessly Create Presentations with SlidesAI

App screenshot

How to Outline Text in Powerpoint: A Step-by-Step Guide

Outlining text in PowerPoint is a breeze once you know where to look. Simply select the text you wish to outline, then navigate to the “Format” tab. Click on “Text Effects”, followed by “Outline”, and choose your desired outline color and weight. And voilà, your text now stands out with a sleek outline!

After you outline your text, it will appear more prominent and eye-catching on your slides, which can be particularly useful for titles, headings, or any text you want to emphasize.

Introduction

Have you ever found yourself squinting at a PowerPoint presentation, trying to read the text that just seems to blend into the background? Or maybe you’re the one giving the presentation, and you want to make sure your audience can clearly see and understand each point you’re making. Enter the art of outlining text in PowerPoint.

Outlining text can make your words pop off the screen, providing a clear distinction from the background and ensuring your message is received loud and clear. It’s a simple yet powerful tool in making your presentation look professional and polished. Whether you’re a student presenting a project, a business professional pitching to clients, or a teacher trying to engage your class, knowing how to outline text can make all the difference. So, let’s dive in and learn how to make your words stand out!

Step by Step Tutorial: How to Outline Text in PowerPoint

Before we get into the nitty-gritty, let’s first understand what these steps will help you achieve. By following the steps below, you will be able to add an outline to your text, making it more visible and impactful on your PowerPoint slides.

Step 1: Select the Text

Begin by clicking on the text box containing the text you want to outline.

Selecting the text is the first step because you need to tell PowerPoint which text you want to modify. Make sure you click on the actual text box and not just somewhere on the slide. If you’re working with multiple text boxes, you’ll need to repeat these steps for each one you want to outline.

Step 2: Navigate to the Format Tab

After selecting the text, go to the “Format” tab on the PowerPoint ribbon.

This step is where the magic begins. The “Format” tab is your gateway to all the text formatting options PowerPoint has to offer, including the outline feature.

Step 3: Click on Text Effects

In the “Format” tab, look for the “Text Effects” button and click on it.

The “Text Effects” button is a little treasure trove of options that can make your text do some pretty cool things. But for now, we’re focused on the outlining part.

Step 4: Choose Outline

In the “Text Effects” menu, hover over “Outline” to see the outline options, and then click on your choice of outline color and weight.

The outline color is the color of the outline itself, while the weight is how thick or thin you want that outline to be. You can choose from a range of colors and weights to find the perfect look for your text.

BenefitExplanation
Enhanced VisibilityAdding an outline to your text makes it stand out against the background, making it easier for your audience to read.
Professional LookAn outline can give your text a sleek, professional appearance that adds to the overall quality of your presentation.
Emphasis on Key PointsOutlining text is a great way to draw attention to important headings or points you want your audience to remember.
DrawbackExplanation
Can Be DistractingIf overused, outlined text can become distracting and take away from the content of the presentation.
Limited CompatibilitySome older versions of PowerPoint might not support all text outline features, which can be a limitation for those not using updated software.
Time-ConsumingFor presentations with a lot of text, outlining each section can be time-consuming if not done efficiently.

Additional Information

When it comes to outlining text in PowerPoint, there are a few extra tidbits that can enhance your experience. For instance, did you know that you can also create custom outline colors? If the default options don’t suit your fancy, simply click on “More Outline Colors” for a full spectrum of choices. Additionally, you can even apply gradient outlines for a more dynamic effect.

Another tip is to consider the background of your slides when choosing your outline color and weight. You want to create enough contrast to ensure readability but also maintain a harmonious color scheme. Also, don’t forget that you can apply transparency to your outline, which can sometimes result in a more subtle but equally effective emphasis.

Lastly, remember that less is often more. Outlining every piece of text on your slide might overwhelm your audience. Use outlines strategically to highlight the most crucial information or to make titles and headings stand out.

  • Select the text you want to outline.
  • Navigate to the “Format” tab.
  • Click on “Text Effects”.
  • Choose your desired outline color and weight from the “Outline” options.

Frequently Asked Questions

Can i apply an outline to text in all versions of powerpoint.

Yes, most versions of PowerPoint offer the ability to outline text, but the steps might differ slightly depending on your software version.

Is it possible to outline text in PowerPoint on a Mac?

Absolutely! The steps are essentially the same as on a PC, so Mac users can outline their text with ease.

Can I remove the outline from the text later?

Definitely. Just follow the same steps and choose “No Outline” from the outline options to remove it.

Will the outline show up when I print my slides?

Yes, the outline will be visible on printed slides, making your text stand out even on paper.

Can I save a text style with an outline as a default for future presentations?

While you can’t set it as a default, you can save a text box with the desired style as a template and copy it into future presentations.

Mastering the task of outlining text in PowerPoint can give your presentations that extra oomph they need to captivate your audience. It’s a tool that, when used wisely, can take your slides from mundane to memorable.

Remember, the key to successful text outlining lies in balance. Use it to highlight, not to overshadow. With this newfound knowledge, your next presentation is sure to be a hit. Happy outlining!

Matt Jacobs Support Your Tech

Matt Jacobs has been working as an IT consultant for small businesses since receiving his Master’s degree in 2003. While he still does some consulting work, his primary focus now is on creating technology support content for SupportYourTech.com.

His work can be found on many websites and focuses on topics such as Microsoft Office, Apple devices, Android devices, Photoshop, and more.

Share this:

  • Click to share on Twitter (Opens in new window)
  • Click to share on Facebook (Opens in new window)

Related Posts

  • How to Download a Google Slides Presentation as a Powerpoint File
  • How to Outline Font in Word 2013: A Step-by-Step Guide
  • How to Add a Text Box Outline in Excel 2013: A Step-by-Step Guide
  • How to Do a Powerpoint Google Slides Presentation Conversion
  • How to Outline a Selection in Photoshop CS5: A Step-by-Step Guide
  • How to Hide Background Graphics in Powerpoint 2013: A Step-by-Step Guide
  • Can You Save a Powerpoint as a Video in Powerpoint 2013? Find Out Here!
  • How to Rotate a Powerpoint Slide Presentation
  • How to Delete Multiple Slides in Google Slides: A Step-by-Step Guide
  • How to Save Powerpoint as PDF with Notes: A Step-by-Step Guide
  • How to Make Text Vertical in Google Docs
  • How to Make Google Slides Vertical (5 Quick Steps)
  • How to Remove Background Color in Google Docs
  • How to Add a Hyperlink on Google Slides
  • How to Set Google Docs Background Image
  • How to Mirror Image in PPT Files (An Easy 6 Step Guide)
  • How to Insert a Google Slides Page Number: Step-by-Step Guide
  • How to Make a Powerpoint Slide Vertical in Powerpoint 2013: A Step-by-Step Guide
  • How to Add a Border to a Picture in Google Slides: A Step-by-Step Guide
  • How to Delete a Slide in Powerpoint 2010: Step-by-Step Guide

Get Our Free Newsletter

How-to guides and tech deals

You may opt out at any time. Read our Privacy Policy

how to create a powerpoint presentation from an outline

Create and print a presentation in Outline view

Outline view in PowerPoint displays your presentation as an outline made up of the titles and main text from each slide. Each title appears on the left side of the pane that contains the Outline tab, along with a slide icon and slide number. The main text is indented under the slide title. Graphic objects appear only as small notations on the slide icon in Outline view.

Working in Outline view is particularly handy if you want to make global edits, get an overview of your presentation, change the sequence of bullets or slides, or apply formatting changes.

When you're creating your outline, think about how many slides you need. You probably want at least:

A main title slide

An introductory slide that lists the major points or areas in your presentation

One slide for each point or area that is listed on the introductory slide

A summary slide that repeats the list of major points or areas in your presentation

By using this basic structure, if you have three major points or areas to present, you can plan to have a minimum of six slides: a title slide, an introductory slide, one slide for each of the three major points or areas, and a concluding summary slide.

If you have a large amount of information to present in any of your main points or areas, you may want to create a sub-grouping of slides for that material by using the same basic outline structure.

Consider how much time each slide should be visible on the screen during your presentation. A good standard estimate is from two to five minutes per slide.

Create a presentation in Outline view

On the View tab, in the Presentation Views group, click Outline .

In the slide thumbnail pane, place the pointer, and then either paste your content or begin typing text.

The first text you type will be a title, indicated by boldface type. Press ENTER when you've completed the title.

PowerPoint uses the Enter key on the keyboard to start a new line in an outline. The new line is automatically at the same hierarchical level as the one you just typed. To change that hierarchical level:

Press the Tab key on the keyboard to move the current line downward one level in the outline hierarchy.

Press Shift+Tab to move the current line upward one level in the outline hierarchy.

View a presentation in Outline view

Print a presentation in outline view.

Open the presentation that you want to print.

Click File > Print .

In the Print dialog box, under Settings , select the second box (which by default is set to Full Page Slides ) to expand the list of options. Then, under Print Layout , select Outline .

The layout for printing an outline

You can choose a page orientation (Portrait or Landscape) in the Printer Properties dialog box.

Click Print .

(For more complete information on printing, see the article Print your PowerPoint slides or handouts .)

Facebook

Need more help?

Want more options.

Explore subscription benefits, browse training courses, learn how to secure your device, and more.

how to create a powerpoint presentation from an outline

Microsoft 365 subscription benefits

how to create a powerpoint presentation from an outline

Microsoft 365 training

how to create a powerpoint presentation from an outline

Microsoft security

how to create a powerpoint presentation from an outline

Accessibility center

Communities help you ask and answer questions, give feedback, and hear from experts with rich knowledge.

how to create a powerpoint presentation from an outline

Ask the Microsoft Community

how to create a powerpoint presentation from an outline

Microsoft Tech Community

how to create a powerpoint presentation from an outline

Windows Insiders

Microsoft 365 Insiders

Was this information helpful?

Thank you for your feedback.

How-To Geek

Everything you need to know about animations and transitions in powerpoint.

4

Your changes have been saved

Email is sent

Email has already been sent

Please verify your email address.

You’ve reached your account maximum for followed topics.

If Your PC Won't Run Windows 11, Here Are 5 Great Linux Operating Systems to Try Instead

How i turned a raspberry pi into a bluetooth smart speaker, the next windows 11 update will automatically encrypt your pc, quick links, what are animations, what are transitions, things to note before you begin, how to add, amend, and remove an animation, how to add, amend, and remove a transition, using the morph transition.

PowerPoint's animations and transitions can help you grab your audience's attention, present information in bite-sized chunks, and—when used sparingly—deliver a more professional presentation. In this article, we'll run through the nuts and bolts of these useful PowerPoint tools.

PowerPoint's Animation drop-down is opened, displaying the many different types of animations available.

Animations are effects you can add to your slides' text, pictures, shapes, graphics, tables, and other elements. There are four different types of animations:

  • Entrance animations—These are the effects you can add to make an object appear on your slide in different ways.
  • Emphasis animations—You can add an emphasis animation to an object already visible on your slide, such as changing its size or color.
  • Exit animations—The opposite to entrance animations, exit animations make objects disappear from your slide through different effects.
  • Motion paths animations —You can make an element on your slide move to a different place, with your audience seeing this movement from where it started to where it ends up.

You can use more than one animation on a single object. For example, you can apply an entrance animation to some text, followed by an emphasis animation.

PowerPoint's Transiton drop-down is opened, displaying the many different types of transitions available.

A transition effect dictates how your presentation progresses from one slide to the next, and you can choose from three different levels of complexity:

  • Subtle—These are the most basic types of transitions in PowerPoint, aiding speed and slickness as you jump from one slide to the next.
  • Exciting—You can make your transitions more visually entertaining.
  • Dynamic—A dynamic transition applies to all parts of a slide, except for the background, giving the illusion that the content is rolling through on a single page.

Only one transition effect can be added to each slide, and it's important that you apply the transition to the slide that will be visible once the transition is complete. For example, if you have two slides and want to create a transition effect as you move from slide 1 to slide 2, you will need to apply the transition to slide 2.

Before you add animation and transition effects to your PowerPoint presentation, bear in mind the following tips:

  • Don't add too many animations and transitions . Overusing these features can distract your audiences in ways you didn't intend to, and they can also look tacky and unprofessional. Ask yourself, "Does this make my presentation better?" If the answer is no, don't add it.
  • Another issue with using too many animations and transitions is that it could significantly slow down your PowerPoint file's processing speed , as it adds volume to your file size.
  • Keep things professional in the right contexts. For example, if you're presenting a formal business plan, you don't want to add funky transitions that take ten seconds to complete. Try sticking to slick effects that last less than a second.
  • Use the same transition effect for each slide and, if you can, the same animation for each item.

It's a widely shared opinion that Microsoft 365's desktop apps offer more flexibility and functionality than their web-based counterparts. However, the exact opposite can be said for adding animations, which is significantly easier to do on PowerPoint for the web than via the subscription-only app. So, to create the animations for screenshots in this section, we have used PowerPoint online, rather than the desktop app, and we recommend that you do the same.

Before you add any animations, click "Animation Pane" in the Animations tab on the ribbon. This will open a pane on the right side of your window, which will make seeing and managing your animations much easier.

The Animation Pane button in PowerPoint is selected.

Now, select the item you want to animate. If you want several items on a slide to animate in the same way at the same time, hold Ctrl while clicking them all. Then, click the down arrow in the Animations tab, and choose the appropriate effect.

An item selected in PowerPoint, and the Animation drop-down choices displayed.

You will then see an animation card in the Animation Pane for the effect you just added. Here, you can change the animation type, how it is activated (whether via a click, with the previous animation, or after the previous animation), and the duration and delay.

An animation card in the Animation Pane on PowerPoint for the web.

If you have more than one animation on a slide and want to reorder them, click and drag the six dots next to the relevant animation card upwards or downwards.

The six dots used to reorder animations in the Animation Pane is highlighted, with arrows indicating it can be moved upwards or downwards.

Finally, to remove an animation, click the trash icon on the appropriate animation card.

The trash icons on the animation cards in PowerPoint for the web.

You can also animate paragraphs of text within a text box. To do so, select the relevant text, and follow the same process.

Whether you're using PowerPoint's desktop app or the online version of the program, adding transitions involves a very similar process.

First, select the slide you want to transition to (for example, you'll select slide 2 if you want to create a transition from slide 1 to slide 2) in the slide thumbnail pane, and then click the "Transitions" tab on the ribbon.

A slide selected in PowerPoint, and the Transition tab opened.

To see more transitions, click the down arrow on the right-hand side of the Transition To This Slide group.

The arrow in PowerPoint that, when clicked, displays more transition effects.

Clicking any of the transition effects on display will do two things—first, it will show you a preview of what that transition will look like, and second, it will apply that transition to that slide.

You can then amend the options (such as the direction of the transition) and timing of the transition using the settings on the right side of the Transitions tab. This is where you can also add a sound effect to the transition, or decide whether the transition effect occurs when you click your mouse or automatically after a given length of time.

The additional options that can be added to a PowerPoint transition, such as timing, sound effects, or delays.

If you want to apply the same transition effect and options to all slides, click "Apply To All" in the Timing group of the Transition tab when you have finished setting up your transition's parameters. You can then select individual slides to make further adjustments if needed.

To remove a transition, select the slide in the slide thumbnail pane, and click "None" in the Transitions tab.

A PowerPoint file with the Transitions tab opened, and None selected as the transition type.

PowerPoint's Morph is a transition effect that recognizes differences between the same items on two slides, and smoothly transitions between them when you proceed from one slide to the next. For example, you might have an image on slide 1, and the same image in a different position on slide 2. The morph transition gives your audience the impression that you're still on the same slide, but the objects are merely moving and resizing.

This is different to the motion path animation, which you can set for different items and activate at different times on your slide. The morph transition, however, moves all items together as you move from one slide to the next, saving you from having to apply motion path animations to individual objects. Any objects on the first slide but not the second will simply fade away during the morph transition. Similarly, any new items on the second slide will appear gradually.

In this example, we have a title and an image on slide 1, and the same objects on slide 2 but in different places and different sizes. We created this scenario by copying and pasting the whole of slide 1, and then changing the text and image on slide 2. However, you can also create a blank slide, and then copy and paste the different elements you want to morph.

Two slides in PowerPoint containing the same items but in different positions and different sizes.

Then, we need to select slide 2, and click "Morph" in the Transitions tab on the ribbon.

The morph transition in PowerPoint being applied to slide 2 via the Transitions tab.

Then, press F5 to see your presentation, and witness the smooth morph transition from one slide to the next. You can also use this transition effect to zoom into an image or fade an image into the background. Just ensure that you copy and paste from one slide to the next before you create the transition, so that PowerPoint recognizes them as the same.

If animations and transitions are new to you, check out these other tips that you should also know before you design your next presentation.

  • Microsoft PowerPoint
  • Microsoft 365

Home Blog Business How to Create Engaging and Persuasive Proposal Presentations

How to Create Engaging and Persuasive Proposal Presentations

Cover for Proposal Presentation guide by SlideModel

Whether you’re pitching a new project to stakeholders, seeking investment from potential backers, or presenting a solution to a client, the success of your proposal hinges on your ability to convey your ideas clearly and convincingly. It’s not enough to count on flashy graphics: the presenter must understand how to communicate ideas in the same business language as their target audience. 

This article explores the critical components of a successful proposal presentation, providing you with practical insights and strategies to craft and deliver a compelling pitch. From understanding the core elements and structuring your presentation to delivery techniques, this comprehensive guide will equip you with the tools you need to make your proposal stand out and achieve your business objectives.

Table of Contents

What is a Proposal Presentation?

What makes a great proposal presentation, elements of a proposal presentation, how to start a proposal presentation, tips for delivering the proposal presentation, how to end a proposal presentation, recommended ppt templates for proposal presentations, final words.

A proposal presentation is a communication framework aimed at convincing an audience to adopt a certain idea, plan, or project. It serves as a persuasive tool to pitch products, services, or concepts to potential clients, investors, or stakeholders. A business proposal presentation often incorporates data, case studies , and visuals to build a compelling argument, making it an essential aspect of business development and strategic planning .

A great proposal presentation is clear, concise, and compelling. It captures the audience’s attention, holds their interest, and convincingly presents the proposed solution’s benefits. The following attributes contribute to a successful presentation:

Avoid jargon and overpopulated sentences that might confuse your audience. Use straightforward language to ensure your message is easily understood. If you need to introduce a complex concept in your presentation, work your way through graphics and try to simplify ideas as much as possible.

A well-thought presentation structure guides the audience through the proposal logically. It should start with an introduction that outlines the purpose, followed by a detailed discussion of the problem, proposed solution, implementation plan, and expected benefits.

Visual Appeal

Visual elements such as charts or graphs , images, and videos can enhance understanding and retention. To maintain a polished look, use a consistent and professional design for your slides.

Tailor your content to the audience’s needs and interests. Address their pain points and demonstrate how your proposal provides a solution. Use relevant examples and case studies to support your arguments.

Engage your audience with questions, interactive presentation elements, and storytelling . Personal anecdotes or client testimonials can make your presentation more relatable and persuasive.

In order to create a winning proposal presentation, we must count with the following elements.

Title Slide

This is the audience’s first impression. It sets the context and tone for the entire presentation and must feature a professional and polished look.

Clearly state the presentation title, your name, and the company’s name. If relevant, add a date, but it’s not absolutely required. Branding presentation elements like logo, colors, and fonts need to remain consistent to reinforce your company’s identity. You can use a pertinent image or graphic to the presentation topic (i.e., if it’s a product presentation , a product photo highlighting your product) to make the slide more visually appealing.

Title slide in a real estate proposal presentation

Avoid cluttering the slide with too much text. Any secondary information, like what the presentation is about, belongs on the introduction slide. Complex animation effects may deter the audience’s focus and render your slide deck amateurish. 

Another common mistake is to use poor font pairing choices, e.g., script fonts with poor readability or low-sized texts.

Introduction Slide

Here, we provide the audience with an overview and context for the proposal, outlining the problem or opportunity. Factual information like financial data , surveys, or any kind of data presentation that can back up your problem statement is relevant. Remember to deliver a teaser of the full problem or opportunity, as that information is bound to be expanded in the next slide.

Explain the purpose of your proposal and what you aim to achieve. This will give the audience a clear understanding of the presentation’s objective from the outset. However, you should avoid ambiguous statements that can confuse the audience. 

Introduction slide business proposal presentation

Problem Statement Slide

Clearly defining the problem or opportunity is essential for establishing the need for your proposal. It helps the audience understand the context and significance of your proposal. A well-articulated problem statement sets the stage for your proposed solution and underscores the urgency or importance of addressing the issue.

Support your statement with data, statistics, and real-world examples to illustrate the problem’s impact. Data adds credibility and helps quantify the issue. Additionally, we can make the problem relevant to the audience by linking some of its key points to their experiences or interests. This is a social proof of how the problem affects them directly or indirectly.

Problem statement slide proposal presentation

Compare the current situation with industry benchmarks or best practices to highlight the gap or deficiency. On this behalf, there are excellent presentation tools like gap analysis templates and comparison chart templates .

Proposed Solution Slide

The proposed solution is the core of your presentation, outlining how you plan to address the problem or seize the opportunity. This section is crucial for convincing the audience of your proposal’s feasibility and effectiveness. A coherently conveyed solution can demonstrate your expertise, innovation, and ability to deliver results.

Provide a detailed explanation of your proposed solution. Break it down into clear, actionable steps to help the audience understand how it works. Emphasize the solution’s benefits and competitive advantages . Explain how it will address the problem or capitalize on the opportunity. Diagrams, charts, and infographics are powerful tools to visually represent your solution without requiring lengthy walls of text in your slides. We invite you to check our article on how to present a project proposal for more strategies.

Solution slide proposal presentation

Don’t overlook possible challenges or limitations of your solution, as they are likely to come up in a Q&A session. Address them proactively and explain how you plan to mitigate them.

A good practice is to conduct a cost-benefit analysis to show the financial feasibility of your solution. Compare the costs involved with the expected benefits to demonstrate value for money. 

Implementation Plan Slide

The implementation plan outlines the steps necessary to execute your solution, demonstrating feasibility and practicality. This section is key for convincing the audience that your proposal is not just theoretical but actionable and achievable. A detailed and realistic implementation plan can build confidence in your ability to deliver the proposed solution.

Outline the key steps, timelines, and resources needed to implement your solution. A detailed plan helps the audience understand what is required to bring your proposal to fruition. Identify major milestones and deliverables, as they provide a sense of progress and achievement, helping to keep the project on track. 

Implementation plan project proposal presentation

Finally, develop a risk management plan to identify, assess, and mitigate potential risks. A robust risk management plan can enhance the audience’s confidence in your proposal.

Financials Slide

The financial section demonstrates the economic viability of your proposal. This section provides a detailed analysis of the costs involved, potential revenue, return on investment (ROI), and overall financial impact.

Financial slide business proposal presentation

Don’t underestimate costs or overestimate revenues. Be realistic in your financial projections to maintain credibility. A break-even analysis is excellent for showing when the project will start generating profit, which boosts the perception of the proposal’s financial viability.

Conclusion Slide

The conclusion summarizes your presentation’s key points and reinforces your proposal’s value. It provides a final opportunity to persuade the audience and leave a lasting impression. A strong conclusion can help seal the deal and gain the support or approval needed for your proposal.

Recap the main points of your presentation, including the problem, proposed solution, implementation plan, and financials. Emphasize the benefits and value of your proposal and highlight the positive outcomes and advantages of your solution.

End with a clear call to action, specifying what you want the audience to do next. A call to action can include approval, funding, support, or any other desired outcome.

Conclusion slide proposal presentation

There are numerous ways on how to start a presentation , especially for proposals, but in our experience, it’s best to stick with a strong, attention-grabbing opening statement. You can pick from a surprising fact related to your problem statement, a compelling statistic, or even a thought-provoking question linked to your proposed solution.

An icebreaker can help relax the audience and make them more receptive to your presentation. For instance, you could share a relevant and engaging story or anecdote that ties into the theme of your proposal. A personal story can humanize you and make the presentation more relatable.

Another approach is to ask the audience a simple question that requires a show of hands or a quick verbal response. This encourages participation and makes the audience feel involved from the start.

Acknowledge the audience’s role or contributions with a personal touch. For in-company presentations, you can use a line similar to: “I know that many of you have been working tirelessly to improve our company’s performance, and I believe this proposal can help us achieve even greater success.” This creates a common ground with the audience, increasing their interest in what you have to say next.

Tip #1 – Voice Tone

Use pitch, tone, and volume variations to emphasize key points and maintain audience interest. Speak at a moderate pace, as speaking too fast can confuse the audience, whereas speaking too slow can lead to boredom.

Tip #2 – Use Silence Effectively

Working with pauses in your speech can help important points sink in. Silence in a presentation is a powerful tool for emphasis, and as a speaker, you can moderate it by introducing a 30-to-50-second pause after a mind-blowing fact about your proposal.

Tip #3 – Be Adaptable

Not all proposal presentations work alike. Be prepared to adapt your presentation if the situation calls for it, such as if you need to move forward with a Q&A session much sooner than you expected. Flexibility shows professionalism and command of your topic.

Tip #4 – Body Language

If space allows, move around the stage or presentation area with purpose. Avoid pacing or fidgeting, which is distracting and causes unease, lack of preparation, and lack of professionalism. Appropriate hand gestures can help emphasize points and convey enthusiasm as long as you don’t overdo it.

Try to stay relaxed and calm. Deep breathing techniques before and during the presentation can help manage anxiety.

Now it’s time to acknowledge how to end a presentation when working with business proposal presentations or any kind of professional-ranged proposal.

As we mentioned before, you need to clearly state what you want the audience to do next. This could be approving the proposal, providing funding, supporting the initiative, or any other specific action. Outline the steps required to move forward. Make it easy for the audience to understand what is needed from them.

Emotions are a persuasive factor in a conclusion. If you feel the proposal is likely to be accepted, paint a vivid picture of the future. Describe the positive outcomes and improvements that will result. Thank the audience for their time, attention, and consideration. Acknowledging their participation helps to build a positive relationship.

In this section, we selected some of our best Project Proposal PowerPoint templates to speed up your slide design process. Keep in mind you can test the Free Business Proposal PowerPoint Template and adapt it to your requirements.

1. Project Proposal Planning PPT Template

Project Timeline PPT Slide

A compendium of tools to meticulously present any kind of project proposal is at one click of distance. It features an intro slide with relevant KPIs, objectives, scope, implementation timeline, resource allocation, risk assessment, and much more. Check it out!

Use This Template

2. Construction Painting Proposal PowerPoint Template

how to create a powerpoint presentation from an outline

Ideal for contractors, architects, interior designers, or any construction professional who needs to deliver a construction proposal to a prospective client, A slide deck listing 15 easy-to-edit slides in a clean layout.

3. Sponsorship Proposal PowerPoint Template

how to create a powerpoint presentation from an outline

This minimalistic slide deck is intended for companies seeking to seal sponsorship deals. It contains all the required tools to discuss sponsorship tiers, benefits, target audience, deliver past experience testimonials, etc.

4. Legal Services Proposal PowerPoint Template

how to create a powerpoint presentation from an outline

For any law firm that wants to power up its game, this proposal presentation slide deck reduces the need for lengthy text paragraphs in slides in favor of easy-to-remember icons with placeholder text areas next to them.

5. SEO Proposal Slide Deck for PowerPoint

how to create a powerpoint presentation from an outline

Digital marketing professionals can learn how to present a proposal by using this creative slide deck. In a sleek blue-to-green gradient and white color scheme, the 18 slides available in this proposal PPT template offer a broad range of tools to create a winning proposal presentation.

Crafting an effective proposal presentation requires meticulous planning and strategic execution. Each element must be well-organized and clearly articulated, from a compelling opening to a persuasive conclusion. By following the methodology shown in this article, you can enhance your proposal’s impact, build credibility for your brand, and increase the likelihood of securing support from your audience, whether they are investors, clients, or internal stakeholders.

Like this article? Please share

Business Ideas, Business Presentations Filed under Business

Related Articles

Key Insights on How To End a Presentation Effectively

Filed under Presentation Ideas • June 28th, 2024

Key Insights on How To End a Presentation Effectively

Learn key insights on how to end a presentation, with professional tips, PowerPoint templates examples and real life experiences.

How to Master Roadshow Presentations

Filed under Business • June 12th, 2024

How to Master Roadshow Presentations

Get to know a how to approach a roadshow presentation and deliver a winning speech. A guide for roadshow presentation slides, with recommended tools.

How to Compress PowerPoint Presentations

Filed under PowerPoint Tutorials • May 28th, 2024

How to Compress PowerPoint Presentations

You don’t need to end up with gigantic PowerPoint files you cannot email or distribute with ease. Instead, learn how to compress PowerPoint presentations by applying any of these 6 different methods.

Leave a Reply

how to create a powerpoint presentation from an outline

IMAGES

  1. Microsoft Office Tutorials: Create a PowerPoint presentation from an

    how to create a powerpoint presentation from an outline

  2. 30 Perfect Presentation Outline Templates (+Examples)

    how to create a powerpoint presentation from an outline

  3. 30 Perfect Presentation Outline Templates (+Examples)

    how to create a powerpoint presentation from an outline

  4. 9+ Presentation Outline Templates

    how to create a powerpoint presentation from an outline

  5. Outline Powerpoint Presentation Examples

    how to create a powerpoint presentation from an outline

  6. How to Create a PowerPoint Presentation from an Outline in Word

    how to create a powerpoint presentation from an outline

COMMENTS

  1. Create a PowerPoint presentation from an outline

    Import a Word outline into PowerPoint. Open PowerPoint and select New Slide > Slides from Outline. In the Insert Outline dialog box, find and select your Word outline and select Insert. Note: If your Word document contains no Heading 1 or Heading 2 styles, PowerPoint will create a slide for each paragraph in your content.

  2. How to Make a PowerPoint Presentation From an Outline

    On either the Home or Insert tab, select the New Slide drop-down menu. Pick "Slides From Outline." Browse for the outline file on your computer, select it, and click "Insert." After a moment, you'll see your outline load into PowerPoint. As mentioned, each line of the outline is its own slide.

  3. Convert Outline to PPT

    Join 1 million professionals, students, and educators. Visualize your outlines by converting them into engaging PowerPoint presentations using our AI-powered tool. Convert outlines to PPT quickly and easily, allowing AI to summarize and adapt content for impactful slides. Ideal for students, educators, and professionals.

  4. Create and print a presentation in Outline view

    On the View tab, in the Presentation Views group, click Outline. In the slide thumbnail pane, place the pointer, and then either paste your content or begin typing text. The first text you type will be a title, indicated by boldface type. Press ENTER when you've completed the title. PowerPoint uses the Enter key on the keyboard to start a new ...

  5. How to create PowerPoint slides from an Outline

    Open Microsoft PowerPoint on your computer. Go to the Insert tab. Click on the New Slide option. Select the Slides from Outline option. Choose the outline file and click the Insert button. To ...

  6. How to Write Powerful PowerPoint Presentations Fast With Outlines

    The PowerPoint screenshots that you'll see in this section use a template called Brusher from Envato Elements . Brusher PowerPoint Template is an advanced design tool that makes it easy to create great presentations. Now let's look at how to create PowerPoint outlines: 1. Close PowerPoint (If It's Already Open)

  7. Import a Word outline into PowerPoint

    Open PowerPoint, and select Home > New Slide. Select Slides from Outline. In the Insert Outline dialog box, find and select your Word outline and select Insert. Note: If your Word document contains no Heading 1 or Heading 2 styles, PowerPoint will create a slide for each paragraph in your content.

  8. Outline View in PowerPoint

    All you have to do is follow the 3 simple steps. Step-1: Click on the "File" tab. In the open PowerPoint presentation, click on the "File" tab from the menu ribbon located at the top of the screen. In the sidebar of the "File" menu, click on the "Print" option. Step-2: Click on the "Print Layout" option.

  9. The Outline View in PowerPoint (Ultimate Guide)

    Navigate to the Print Options. On your keyboard, hit CTRL+P to open up the print options for your presentation. 2. Navigate to the Outline View. Within the print options, select the 'Full Page Slides' dropdown (the default setting) and within the menu in the upper right-hand corner, select the Outline View.

  10. How to Create PowerPoint Slides from a Microsoft Word Outline

    Tips in this lesson:- Creating Outlines in Microsoft Word- Using Microsoft 365 Styles- Generating New PowerPoint Slides from Microsoft Word Outline- Adding a...

  11. Creating a PowerPoint presentation from an outline

    The course gives a practical approach to organizing a presentation with an outline and then building slides to support the speaker. This can help you stand out when creating and giving an ...

  12. PowerPoint Tip: Start Your Presentation with an Outline

    To import an existing outline file, click the drop-down menu under New Slide on the HOME tab, and select Slides from Outline. Navigate to the outline file, and click Insert. Another option is to create an outline in .txt format using Notepad (or any other text editor), as shown in the screenshot below. Normal paragraphs will be converted into ...

  13. How To Create A Presentation From an Outline in Microsoft PowerPoint

    Many times, we create the structure of a Document in Microsoft Word, intending it to be added later in a Microsoft PowerPoint Presentation. We create its ba...

  14. How to Create a Presentation Outline: A Step-by-Step Guide with Examples

    Here are the steps to follow: Provide a Prompt: Enter a brief description of your presentation topic into the AI tool. Customize the Output: Examine the generated outline. You may need to modify the titles of the slides and their order to better suit your needs.

  15. How to Create a PowerPoint Presentation from an Outline in Word

    Then, select New Slide -> Slides from Outline. The Open dialog box will prompt you to select the Word document wherein you have created your outline for the presentation. Look for this file, select it, and click the Insert button. This Insert function will automatically insert your Outline in the same order.

  16. How to create a presentation outline (with examples)

    Method 4: Create a presentation outline using a template. Last but not least, using a template is a good way to speed up the process of creating a new presentation outline. Similar to using an AI presentation maker, a template can give you a first draft of an outline that is easier to edit and refine than starting from scratch.

  17. Creating a Presentation Outline

    Lesson 1 - Creating a Presentation Outline. Too many presenters start creating a presentation in one of the two following ways: a) they sit down at their computer, open PowerPoint, and start creating slides, or b) they open a past PowerPoint presentation, copy some of the slides into a new file, and hope to add new slides that will complete ...

  18. A step-by-step guide to captivating PowerPoint presentation design

    By adding boxes, you'll create a visually pleasing structure that guides your audience through the content. In the "Insert" menu, select "Table" and opt for a one-by-one table. Change the table color to a light gray shade, elongate it, and position it neatly to the left of your text. To improve readability and aesthetics, increase the spacing ...

  19. How To Turn Powerpoint Into Outline

    Click on the "File" tab in the upper left-hand corner of the screen. Step 2: Select "Export". Upon clicking "File", new options will appear. Click on "Export" from the options in the File tab. Step 3: Create Handouts. Click "Create Handouts" under the Export tab then press the "Create Handouts" icon. Step 4: Select ...

  20. How to Create a Powerful Presentation Outline? 6 Key Tips

    Enhance with Quotes, Testimonials, or Data. Make your presentation more interesting by adding extra info like quotes, testimonials, or data. It can make your audience more engaged and reinforce your message. 3. Visualize Your Concepts. How you show your ideas matters a lot.

  21. How To Create an Effective Presentation Outline

    How to create a presentation outline. Follow these steps when creating an outline for your presentation: 1. Consider the purpose of your presentation. When creating a presentation outline, determine your goal. To find this, think about what you want your audience to obtain or support after your discussion. For example, a nonprofit that builds ...

  22. How to Outline Text in Powerpoint: A Step-by-Step Guide

    Step 1: Select the Text. Begin by clicking on the text box containing the text you want to outline. Selecting the text is the first step because you need to tell PowerPoint which text you want to modify. Make sure you click on the actual text box and not just somewhere on the slide.

  23. Create and print a presentation in Outline view

    Outline view in PowerPoint displays your presentation as an outline made up of the titles and main text from each slide. Each title appears on the left side of the pane that contains the Outline tab, along with a slide icon and slide number. ... Create a presentation in Outline view. On the View tab, in the Presentation Views group, click ...

  24. Everything You Need to Know About Animations and Transitions in PowerPoint

    However, the exact opposite can be said for adding animations, which is significantly easier to do on PowerPoint for the web than via the subscription-only app. So, to create the animations for screenshots in this section, we have used PowerPoint online, rather than the desktop app, and we recommend that you do the same.

  25. How to Create Engaging and Persuasive Proposal Presentations

    In order to create a winning proposal presentation, we must count with the following elements. Title Slide. This is the audience's first impression. It sets the context and tone for the entire presentation and must feature a professional and polished look. Clearly state the presentation title, your name, and the company's name.